LAST UPDATED: 4/21/23 – Animating Your Vacation Photos
Wouldn’t it be cool if we could make our vacation pictures come to life? Well, the great news is that you can with the help of the Plotagraph app. This is quickly becoming one of our favorite photo apps because it allows you to take a good picture and make it really fantastic by adding some animation to the image.

To demonstrate how Plotagraph works, let’s start with a simple image I took while at the White Sands National Monument last year. The picture has a pretty sky, and the lighting is great, but other than that the photo is just your ordinary vacation photo.

With the Plotagraph app, we can really spice this photo up and really WOW our family and friends. In this example, I am going to animate that pretty sky. The clouds in the sky will move, but the rest of the image will remain stationary.
| READ MORE: |
 |
| 10 Easy Vacation Photos Tips |
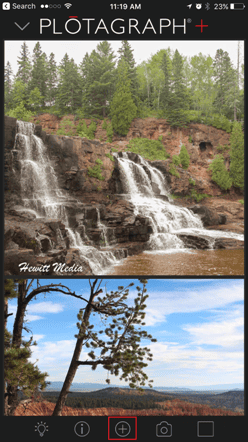
Step 1: Import the Picture
To begin, just open the Plotagraph app on your phone, and import the image you would like to enhance, as I have shown below.
Step 2: Add Animation
Once you have imported your image, you can then begin to add motion to your image. On the bottom toolbar, select the “animate” icon to begin adding animation.
With that selected, take your finger and swipe in one direction to add animation lines (as I have done in the image below). These animation arrows will indicate the direction and the length of movement in your image, once animated.

Step 3: Stop Animation of Stationary Areas
Even though we have our animation arrows added, we still aren’t quite done with our photos. If we were to play our animation at this time, we would see the entire image move with the animation. That would be a mess, so we don’t want that. The next step is to make sure that only the parts of our picture we want to move actually move. There are a few ways in which we can do this.
The first way to prevent sections of our image from moving is to cover those sections with a movement mask. This will prevent any section covered by the mask from moving, while allowing the parts of our image we want to move (the sky in our example) to animate.
To add a mask to the sections of your image you don’t want to move, simply select the “mask” icon on the bottom toolbar. This will display the movement mask paintbrush. You can adjust the size of the paintbrush using the slider on the left-hand side of the screen.
Simply paint over the sections of your photo that you don’t want to move while leaving the sections of your photo that you want to be animated untouched. In our example, we painted everything except for the sky.

If you accidentally cover parts of your picture that you do want to animate with a movement mask, you can go back and remove the mask from those areas by using the eraser tool. To use the eraser tool, simply select the “eraser” icon from the bottom toolbar.
Once selected, simply brush the areas you would like to remove the mask from with the eraser (as shown below). As with the mask tool, you can use the slider on the left to adjust the size of the eraser.

Another way that you can prevent the movement of certain sections of your photo is to add anchors to those parts of the photo. These anchors will anchor the sections of your photo that you want to remain still in place. To add anchors to your photo, select the “anchor” icon on the bottom toolbar.
With that selected, simply place your finger on the image in the areas you would like to anchor in place (as I have shown below). If you are going to use the anchor tool, make sure you have your anchors in the right places.

Step 4: Test the Animation and Adjust
Now that you have added the animation to your image, and you have stopped the movement of the areas you would like to remain stationary, the next step is to test your animation. To test the work you have done animating your vacation photos, simply press the play button on the bottom toolbar, as shown below.

After testing your animation, you can go back and make any necessary adjustments. If you would like to remove some of your animation arrows or change their directions, you can do this with the Select tool. Simply choose the “select” tool from the bottom toolbar and then use it to adjust the animation arrows.
If you wish to delete an animation arrow, you can press the “delete” button that appears on the left-hand side of the screen with an animation arrow selected.

You can also use the crop tool, which is accessible by choosing the “crop” icon on the bottom toolbar, to adjust the width and height of your overall image. If you would like to focus on just a certain portion of your image, you can crop out any unwanted areas using this tool.
Step 5: Set the Animation Speed
Now that you are all set animating your vacation photos, the next step is to set the speed of the animation. For instance, in our example, we have to decide if we want the clouds to be moving really fast, or really slow.
To set the animation speed, select the “speed” icon on the bottom toolbar. Once selected, use the slider to set the frames per second of your animation. The higher the value, the faster the animation will be.

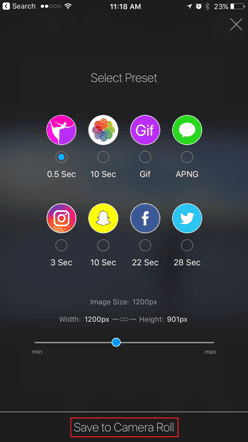
Step 6: Share Your Animation
The last step is to share your new, fully animated, images with your family and friends. Plotagraph makes it very easy to share your animations in a variety of different places. Choose between messages, Twitter, Instagram, Facebook, and more.
To share the work you have done animating your vacation photos, choose the “share” icon on the bottom toolbar. This will bring up a new screen that will ask you to choose how you would like to share your animation. Once you have selected the option you want, press “Save to Camera Roll” to save your image.
You can then go into Twitter, Facebook, Instagram, or your phone’s messenger app to share your new animation. It’s that easy!
The Final Product
Now that you have learned how to animate your vacation photos using Plotagraph, let’s take a look at how our example turned out. You can view the animation that we made of the clouds in my image below. Pretty cool, ha?
Don’t Forget to Subscribe to My Adventures!

Let Me Help You Save On Your Next Adventure!


Awesome and great idea!
Thank you so much!
That’s pretty cool! Thanks for sharing.
No problem! Thanks for reading!
That is very cool! I will check out this app.
It’s pretty terrific. You’ll love it!
Brilliant idea. I haven’t had a chance to try out Plotagraph yet, but I think I may have to!
Thank you for reading! Photography is a lot of fun!
This looks great I’m going to try it soon
Glad you found it helpful. Thank you so much for reading!