LAST UPDATED: 2/11/24 – 5-Steph Photo Editing Process
Many people think you have to be a world-class photographer to take great pictures. This really couldn’t be any further from the truth. There are many simple edits that you can do to your photographs to really increase their appeal. Besides, there is no better way to learn how to edit your photographs than to start experimenting with it.
In this photo editing process tutorial, I am going to walk you through some simple edits that will dramatically improve your photos. Using this process, you can improve the wonderful vacation pictures you take. It will also help improve your confidence in editing your travel photos.
Before we begin, please keep in mind that there isn’t a one-size-fits-all formula for editing photos. Each photograph you take is going to be different.
The subject that you are shooting may be different. For instance, the lighting might be different, the focal length might be different, and so on. For that reason, you are going to need to learn how to identify what needs to be adjusted. Not only that but by how much.
What I am going to provide you with is a photo editing process you can use to adjust certain aspects of your images. What you will need to do is identify how much, if any, adjustment needs to be made in these areas. Believe me, this isn’t as difficult as it may sound. As I am going to illustrate for you, in most cases these changes are glaringly obvious.
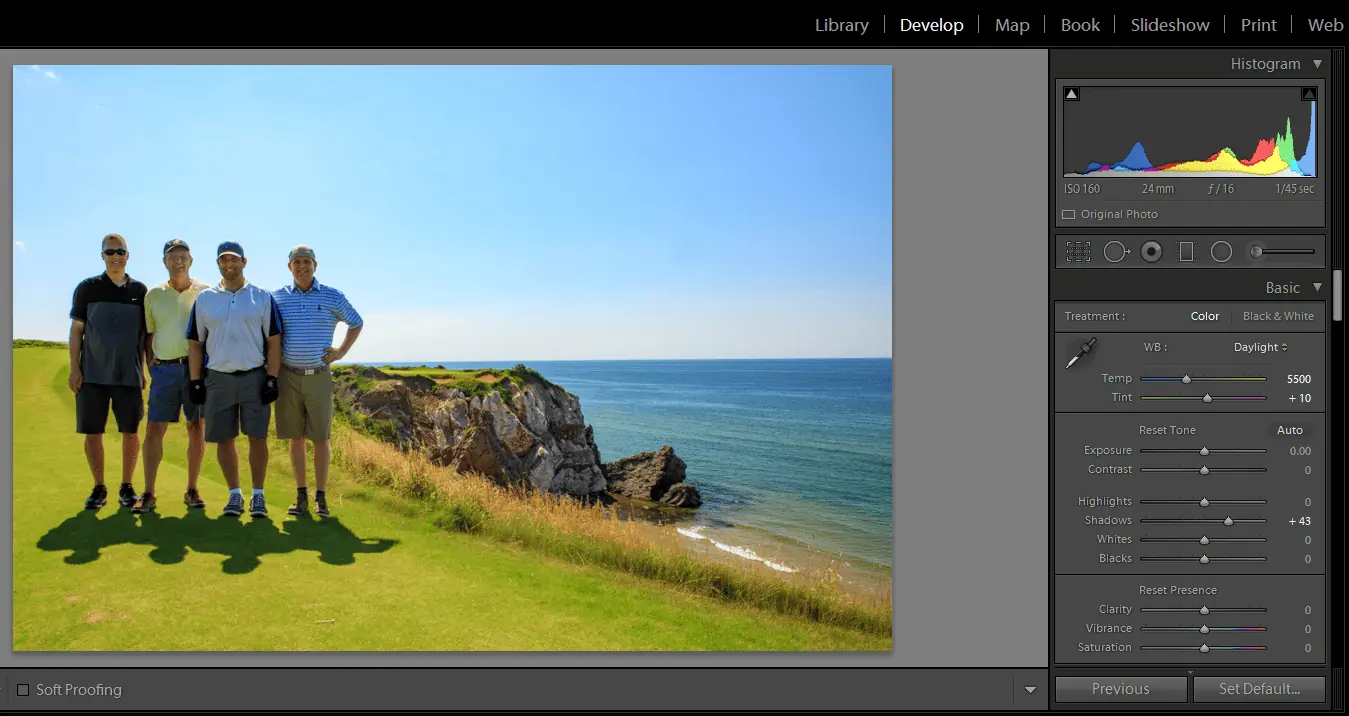
Original Image

To illustrate the photo editing process for you, I have identified a picture I took. This picture was taken while golfing at Cabot Links in Nova Scotia, Canada, and could really use some edits. As you can clearly see in the image above, there are some pretty big issues with this photograph. Those issues include the following:
- Our faces are obscured by shadows.
- There are some dark areas in the corners of the photograph. These were caused by the lens hood I was using when I took the photograph.
- The colors in the photograph appear to be bleached a bit by the sun (bland looking)
- The color of the sky appears to be washed out.
I am sure you were able to recognize many of these issues just by looking at the photograph. So, the question becomes, what can we do about these issues? By following my 5-step workflow for applying basic edits to photographs, we should be able to make some minor adjustments to this picture that have a really big impact on the picture’s appeal. So, let’s get started!
Loading Your Image into Lightroom
Before you can start to make edits to your photographs, the first step is to import your picture(s). You will need to import them into either the Adobe Lightroom desktop or the Adobe Lightroom CC App for iOS or Google Play.
The Adobe Lightroom desktop application is subscription-based and will cost you $9.99 per month. The Adobe Lightroom CC app allows you to use all of the basic editing functionality for free.
If you are taking a lot of pictures with a DSLR or point-and-shoot camera, then the Adobe Lightroom desktop application is probably the way to go. You will get a tremendous bang for your buck with this application. I use this application almost daily.
However, if the pictures you take while traveling are typically taken with your phone, then the Adobe Lightroom CC App is probably sufficient. In addition, it will probably be easier for you to work with (seeing as your pictures will already be on your phone).
Lightroom Desktop
To import your photos into Lightroom using the desktop application, go to the File menu at the top and choose Import Photos and Video. When asked to select your images, browse the images and select them. Your photos will then be imported into your Adobe Lightroom library and be ready for you to edit.

Lightroom App
To import photos into the Adobe Lightroom CC App on your phone or tablet, you will need to open the app and press the Add Photos icon (as highlighted below). You will be asked to choose photos from your camera roll to add to your library. Once the photos have been added to your library, they can be edited using the app.

1. Adjust Highlights and Shadows
Now that we have the photos that we want to edit in Lightroom, the first step in the photo editing process is to adjust the highlights and shadows in the image. Highlights are those areas of the image that are too light to contain any significant detail.
Highlights typically occur when the image was taken in light that was too strong. This is one of the fundamental reasons why it is always better to take pictures during the golden and blue hours of the day (just before and after sunrise and sunset), rather than during mid-day.
Conversely, shadows are areas of your image that are cast in shadows that are too dark to really show any significant detail. You will usually get really bad shadows on the subjects you are shooting when you take photographs of your subjects while facing the sun.
For that reason, if you absolutely need to shoot pictures during the middle of the day, it is always better to take shots with your back to the sun (with the subjects facing the sun).
Both highlights and shadows can really dampen an image if not corrected. No one likes looking at photographs that have washed-out skies with subjects whose faces are obscured by shadows. Luckily, it is rather easy to make some adjustments to both the highlights and the shadows using Adobe Lightroom and Adobe Lightroom CC.
Lightroom Desktop
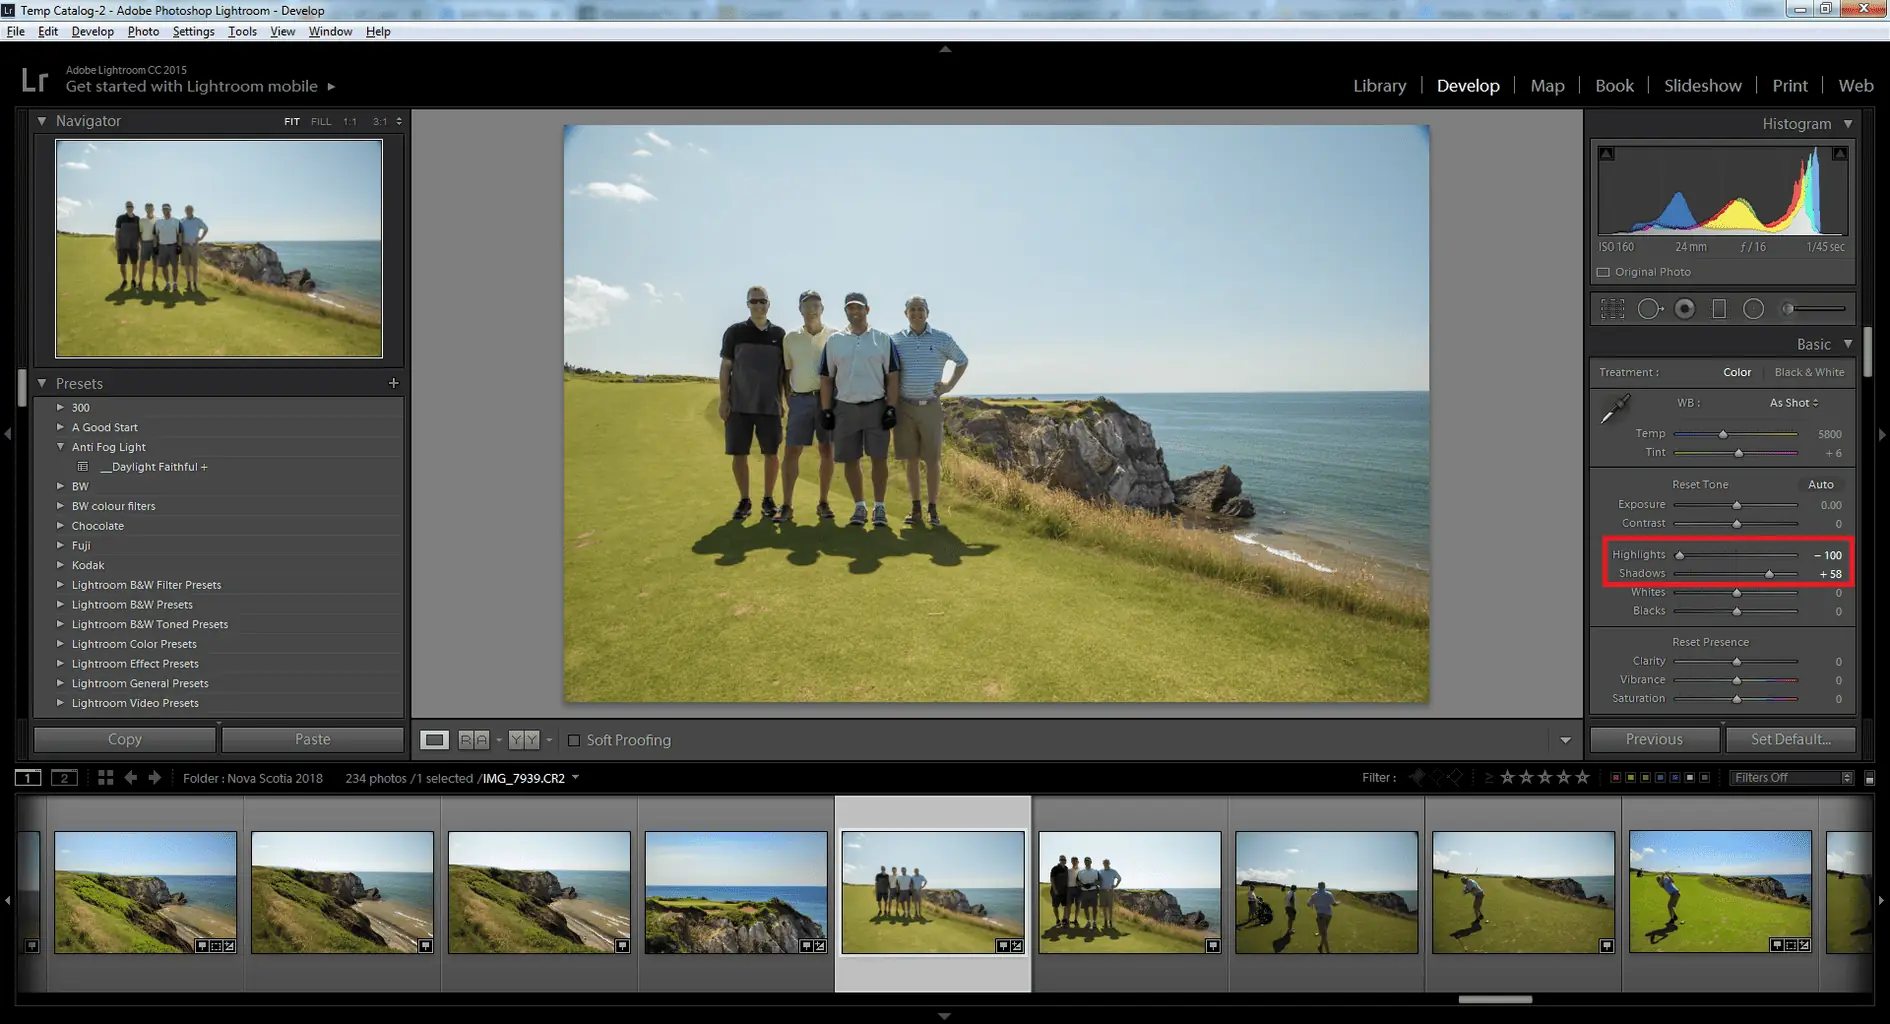
To adjust the highlights and shadows in Adobe Lightroom, select the Develop tab at the top and then select the image you wish to edit from the filmstrip of images at the bottom of the screen. With the image selected in Develop mode, you can use the sliders on the right-hand side to adjust the compensation for highlights and shadows (as illustrated in the photo below).
To adjust for highlights, you will want to move the slider to the left to reduce the effect of the highlights in your image. This will darken the areas of your image that are blown out because of too strong of lighting.
To lighten the shadows in your image, you will want to move the shadows slider to the right. This will lighten the shadows in your image to show detail where previously it was too dark to see detail.
Lightroom App
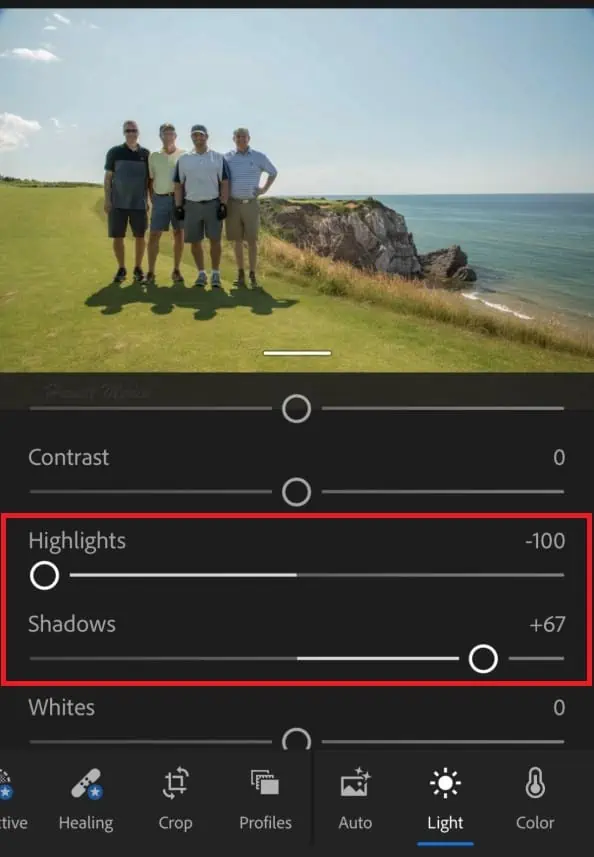
To adjust the highlights and shadows in the Adobe Lightroom CC App, select the Light options group (as illustrated in the image below), and then use the Highlights and Shadows sliders to adjust the highlights and shadows compensation levels.
To adjust for highlights, you will want to move the slider to the left to reduce the effect of the highlights in your image. This will darken the areas of your image that are blown out because of too strong of lighting.
To lighten the shadows in your image, you will want to move the shadows slider to the right. This will lighten the shadows in your image to show detail where previously it was too dark to see detail.
2. Adjust White Balance and Camera Calibration
Once you have made adjustments for the highlights and shadows in your image, the next step in the photo editing process is to adjust the White Balance. As you might recall from some of my other travel photography tutorials, the White Balance is what controls the color balance in your image and has a really big impact on whether or not the colors in your image look natural.
In essence, when you make adjustments to the white balance, you are trying to restore the color balance in your images to what the scene looked like to your eyes when you took the photograph.
Our camera’s sensor, no matter how refined and expensive our cameras are, will be nowhere near as accurate at interpreting color as our eyes are. Adjusting the white balance is our best tool for refining the colors in our pictures so that they are as balanced as the scene looked when we took the picture.
Lightroom Desktop
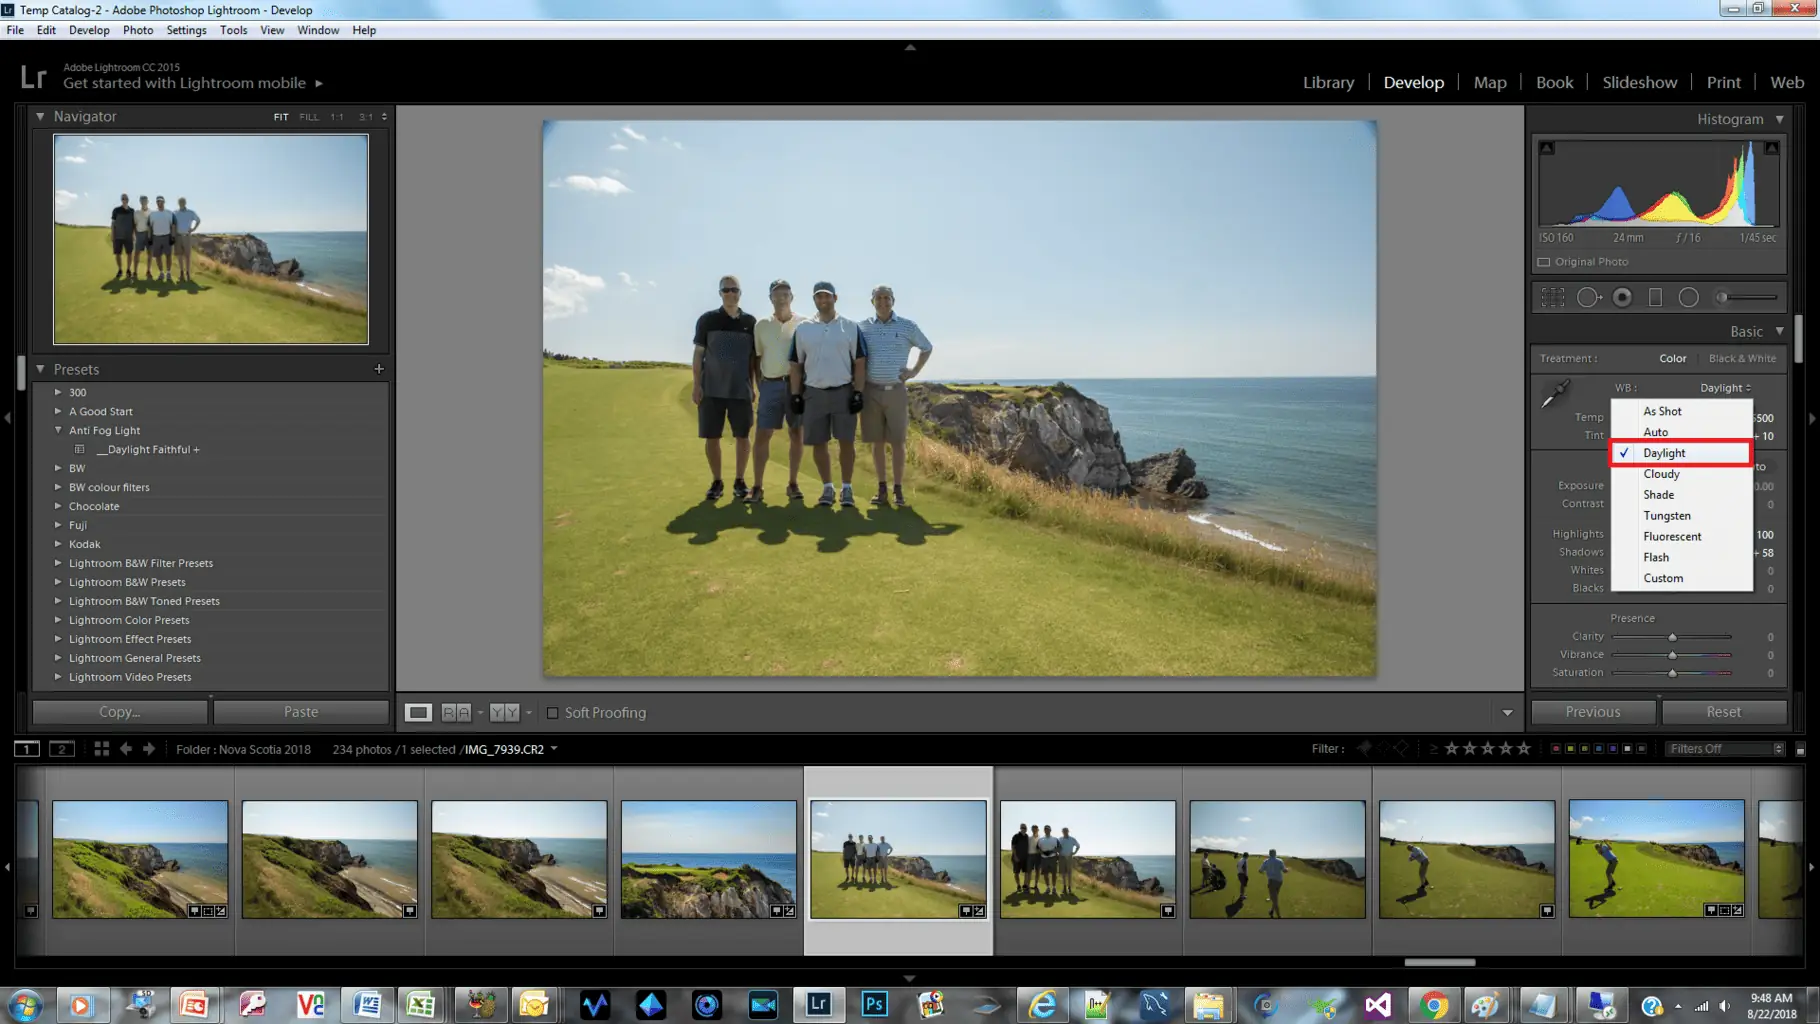
To adjust the White Balance of your image in the Adobe Lightroom desktop application, make sure you have the Develop tab selected and the picture chosen from the list of images along the bottom (as illustrated below). Then, choose the White Balance drop-down, which is highlighted with the red rectangle in the image below, to adjust the White Balance setting for your image.
If you save your pictures in RAW format, which is an option you have with higher-end cameras, then you will have far more options for adjusting the White Balance than you will if you save your pictures on your camera as JPEGs.
Adjusting the White Balance
As you can see below because I have my camera set to save images in RAW format, I can adjust the White Balance setting to Daylight, Cloudy, Shade, Florescent, etc… to match the light conditions that were present when I took my picture. This will adjust the colors in my image to more naturally reflect what my eyes saw when the picture was taken.
If you did save your pictures in JPEG format instead of RAW format, all hope is not lost. You can manually adjust the Temperature of your photograph by sliding the Temperature slider either to the left (to make the colors in the picture cooler) or right (to make the colors in the picture warmer) to manually adjust the color balance.
Adjusting the Camera Calibration
The other setting that you can adjust in Adobe Lightroom that will have a significant impact on the color balance of your images is the Camera Calibration. If you have your camera set to save pictures in RAW format, then you can make some adjustments to your camera’s calibration afterward taking the picture in Adobe Lightroom.
In short, Camera Calibration allows you to make micro-adjustments to your camera’s color interpretation. Every camera interprets color differently and sometimes micro adjustments are needed after your images were taken to make the colors in your image feel more natural based on the type of shot you were taking. For instance, a photo of a landscape will have a different adjustment than a portrait shot of a person, and so on.
To adjust the Camera Calibration, in the right-hand control window, scroll all the way to the bottom until you see the Camera Calibration section. Then, select the drop-down and choose the setting that best pertains to the image you are editing.
For instance, in our demonstration photo, I can choose either a portrait (because there are people in my shot) or a landscape (as the picture includes a beautiful landscape behind us). This will make micro-adjustments to the color interpretation so that they more accurately fit the subject matter I photographed.

Lightroom App
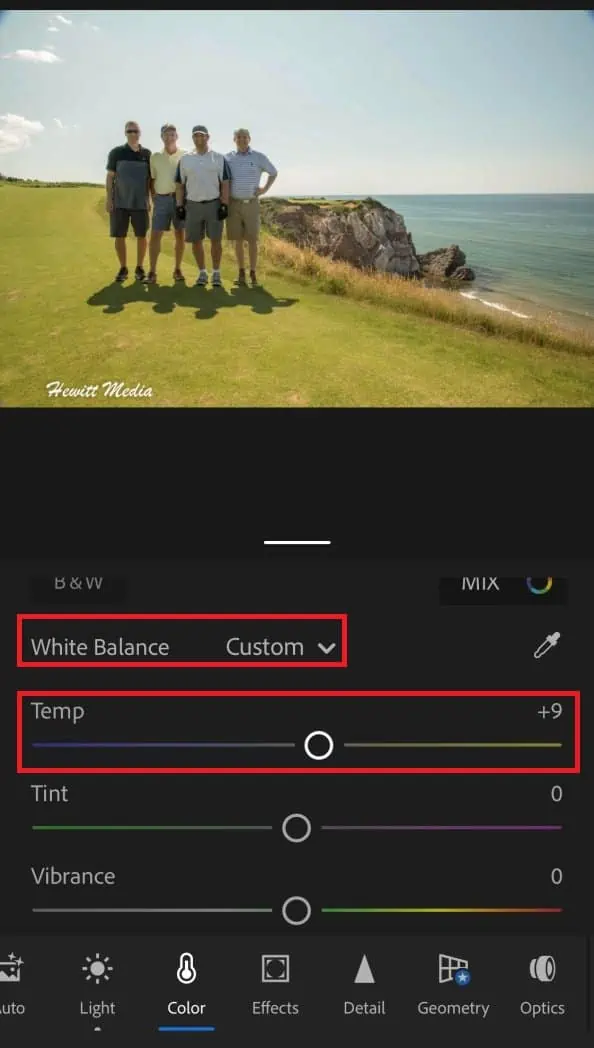
Because you most likely took the photographs with your phone, there likely won’t be as many White Balance setting options available to you in the Adobe Lightroom CC App because your pictures will be in JPEG format. However, that does not mean we cannot make changes to the White Balance manually using the Temperature control.
With the image you want to edit loaded into Adobe Lightroom CC, select the Color setting group (as illustrated in the image below) and then use the Temperature slider to adjust the temperature of your image. You will want to slide the temperature slider to the left to make your image cooler, and to the right if you want to make your image warmer. It’s as easy as that!
3. Adjust Vibrance and Saturation
The next step in the photo editing process is to adjust the Vibrance and Saturation of your image. Again, we are making adjustments to the colors in the image to make them more accurately reflect what we saw with our own eyes when we took the photograph.
Typically, you won’t need to make big adjustments in these areas, but small adjustments do go a long way in making your images really pop when they are viewed.
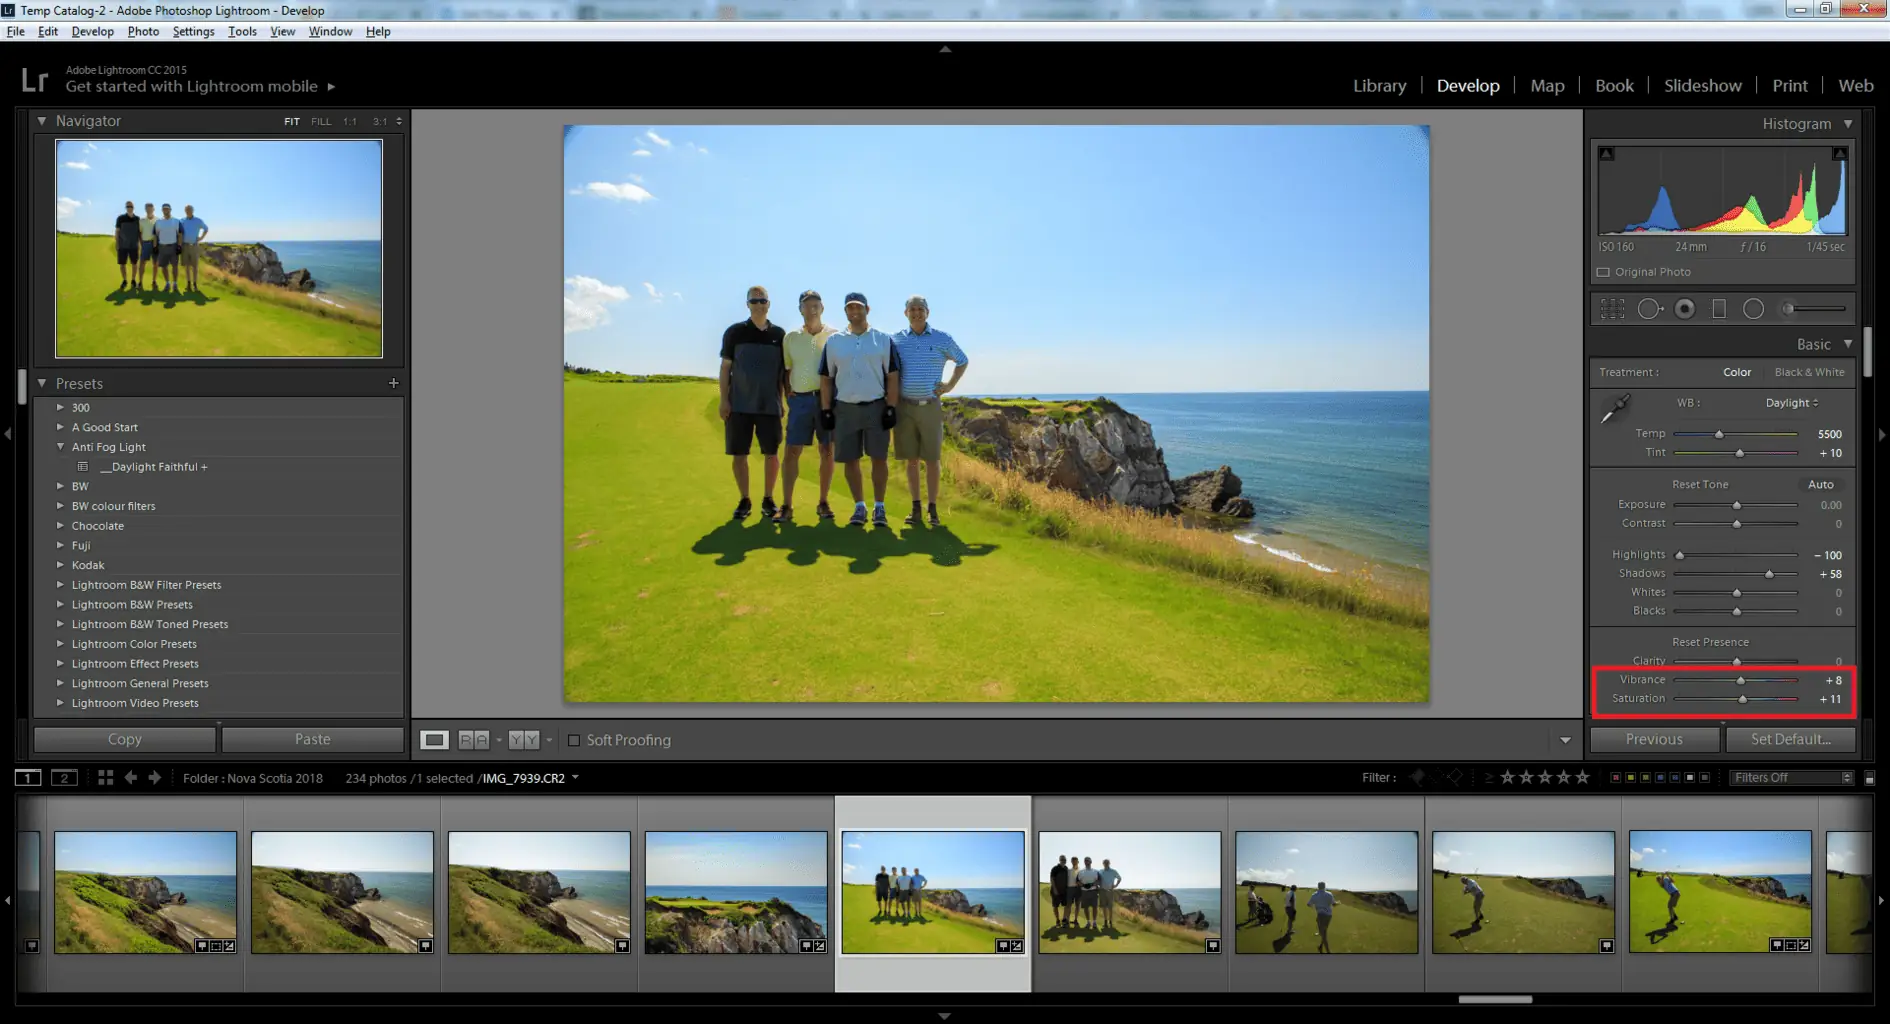
The Vibrance setting will adjust the intensity of the more muted colors in your picture while leaving the already saturated colors as they are. In this case, it is going to make my muted, washed-out sky bluer because the bright sunlight we had when I took the photograph really muted the sky color.
If there are colors in your photograph that look really bland and washed out, making a small adjustment to the Vibrance can go a really long way in making those colors stand out more.
The Saturation setting, on the other hand, will increase the saturation of all of the colors in your image. In the case of my example photo, the bright sunlight also muted even the more well-saturated colors.
Increasing the Saturation level by a small amount will increase the intensity of all of the colors in my image and reduce some of the bleaching that the strong sunlight had on my picture.
Lightroom Desktop
To adjust the Vibrance and Saturation levels in the Adobe Lightroom desktop application, go to the Develop tab, select your image, and then use the Vibrance and Saturation sliders to adjust these settings (as illustrated in the image below). You will slide the sliders to the right to increase the Vibrance and Saturation, and to the left to reduce the Vibrance and Saturation levels.
Lightroom App
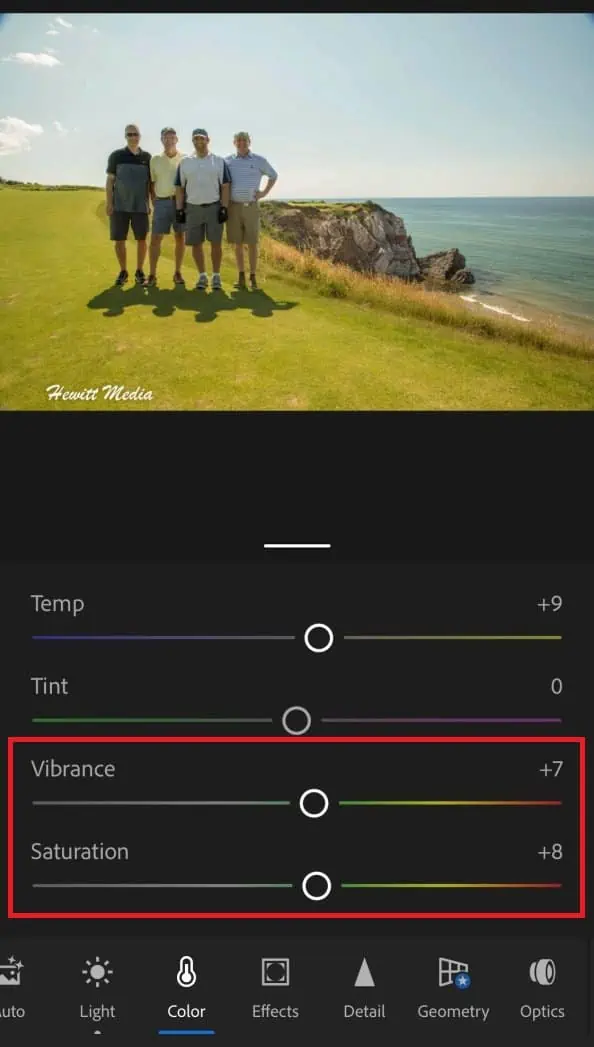
In the Adobe Lightroom CC App, you can adjust the Vibrance and Saturation levels by going to the Color setting group (as illustrated in the image below). Again, you will slide the sliders to the right to increase the Vibrance and Saturation, and to the left to reduce the Vibrance and Saturation levels.
4. Dehaze the Image if Necessary
The next step in the photo editing process isn’t always necessary. Depending on the conditions when your photograph was taken, this may be a step in the process that you can skip. The Dehaze option will allow you to decrease the haziness of your image.
If you took your picture on a foggy day, or if you took your picture of a subject that was really far away on a really hot day, you might want to consider using the Dehaze function in Adobe Lightroom or Adobe Lightroom CC to reduce some of the haze.
However, if you don’t have an issue with haze in your photograph, you probably don’t want to apply this step to your image. The goal of using the Dehaze feature, along with all of the other edits that we are doing, is to make your photograph look as much like what you saw when you took the photograph as possible.
Lightroom Desktop
To use the Dehaze feature in the Adobe Lightroom desktop application, you will want to navigate to the Develop tab and select your image. With your image selected, you will want to select the Adjustment Brush tool (as highlighted in the image below) and then adjust the Dehaze setting (also highlighted in the image below). The larger the value for the Dehaze setting, the more the feature will remove haze from your photograph.
For a really good illustration of how this feature works, please watch the short video I posted below on using the Dehaze feature. I am making some much-needed adjustments to a picture I took of surfers on a beach near Sonoma, California during a strong fog. Those are the perfect circumstances for using this feature to edit your photographs.

Lightroom App
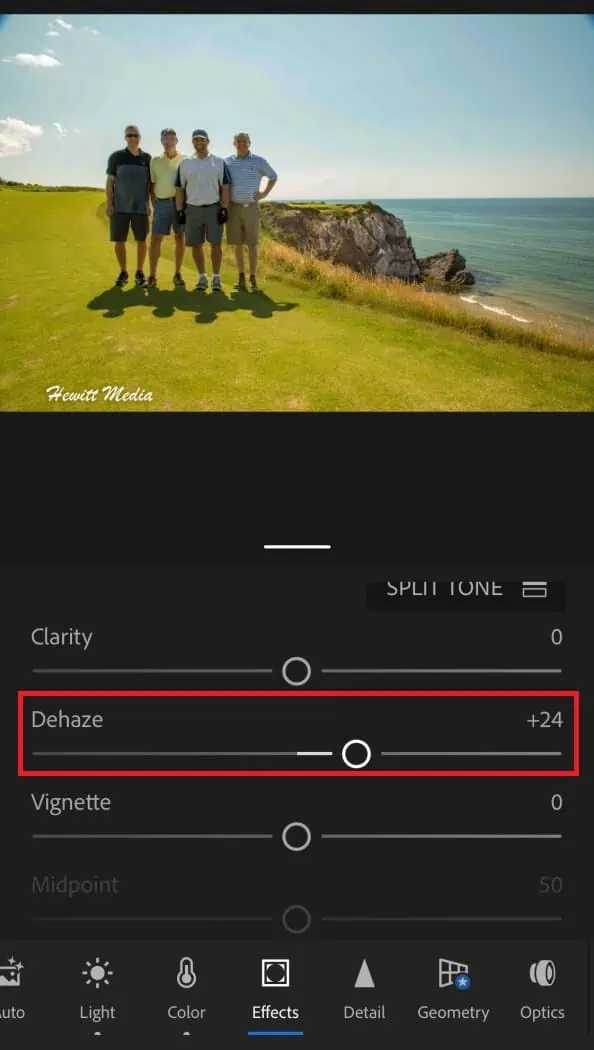
In case you need it, the Dehaze function is also available in the Adobe Lightroom CC App. To access the Dehaze function, first make sure you have your picture selected, then choose the Effects settings group. You can adjust the Dehaze level using the Dehaze slider.
Unlike with the Adobe Lightroom desktop application, the Dehaze function is applied to the whole picture uniformly instead of with a brush. Slide the slider to the right to dehaze your picture more, and to the left to dehaze your picture less.
5. Crop the Image
The last step in the photo editing process is to crop your image. When you are cropping your images, you are looking to accomplish several different things. Most notable among those things are the following:
- Remove any unwanted blemishes on the fringes of your images.
- Construct the most visually appealing composition.
- Straighten the picture along the horizon.
When you take pictures, oftentimes you will have blurriness along the edges of your image because the lens you are using may not be as sharp along the edges, or you might have issues where the lens hood you are using creates shadows in the corners of your images.
The latter is certainly an issue in the example photograph I chose to use for this exercise. You will want to remove those blemishes from your final edited photograph, and cropping your image is the best way to do that.
You will also want to make sure that you create the most ideal composition possible for your final edited photograph. You may want to remove unwanted objects from your photograph, remove distracting details from your photograph, or zoom your image in to highlight certain details of your photograph.
In the example photograph that I used for this exercise, I wanted to zoom in on my brothers, my father, and myself as we were one of the key aspects of this photo. Again, the best way to accomplish all of these things is to crop the photo.
Finally, the last reason you might want to crop your photograph is to straighten the image out. Images are more visually appealing when they are aligned along the horizon. Not in all cases, but in most cases. By cropping the photograph and adjusting the alignment, I was able to adjust my example photo to align it with the horizon in the background.
Lightroom Desktop
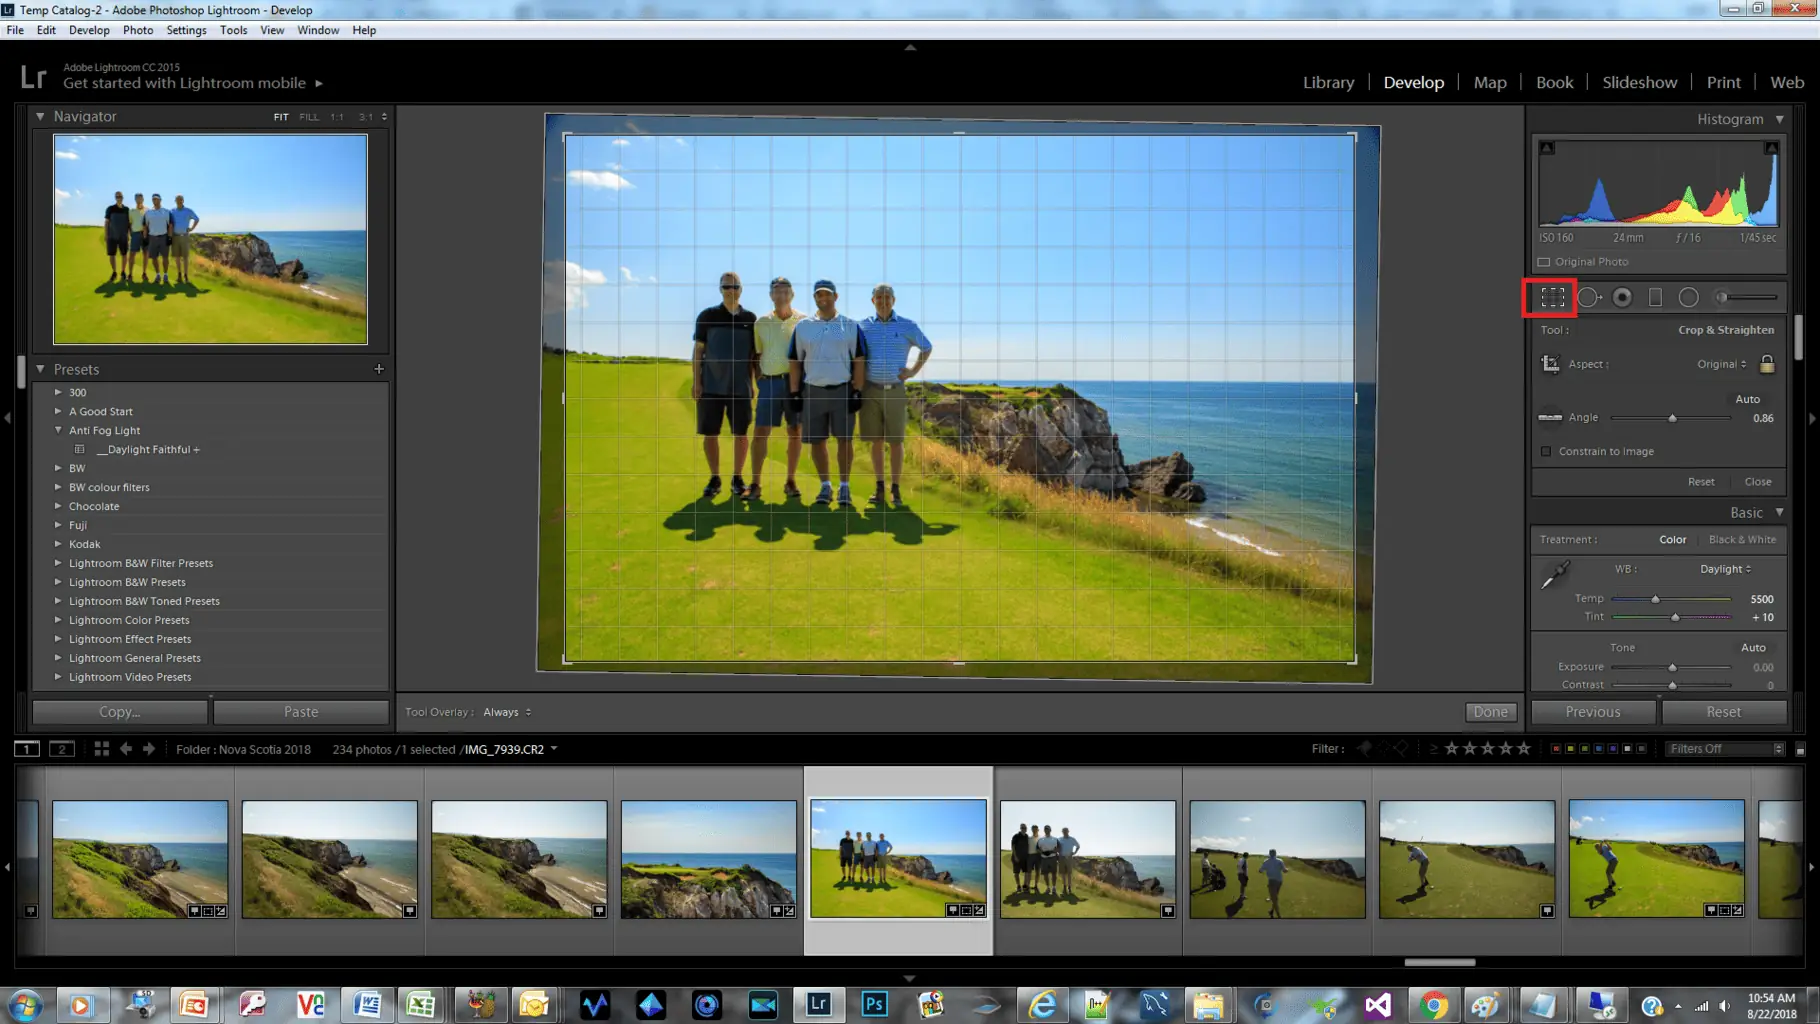
To Crop your images in the Adobe Lightroom desktop application, you will want to load your image into Adobe Lightroom, select the image, and then select the Crop Overlay tool (as illustrated in the image below).
This will create a grid pattern on your image that will allow you to crop your photo. If you move the cursor to the bottom of the image, you will see a line icon with double-sided arrows appear as the mouse cursor. This will allow you to rotate your photograph to align it with the horizon.
Lightroom App
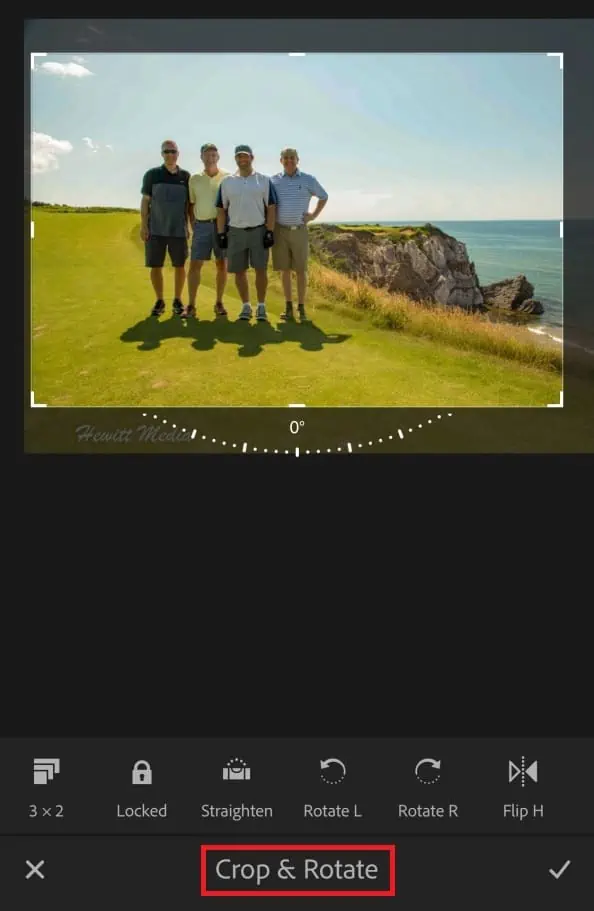
To Crop your image in the Adobe Lightroom CC App, you will want to select your image, and then select the Crop icon on the bottom toolbar. This will bring up handles on the corners and sides of your image that allow you to crop your photo, as well as a compass on the bottom of your image that will allow you to rotate the image to align it with the horizon (as illustrated in the image below).
Finished Product
As you can see in the images below, the final product of this photo editing process has made a significant difference in the quality of my photograph. The best part is, that the whole process took me less than five minutes to complete, and none of the steps required a deep knowledge of photography to complete.
I hope this tutorial and demonstration give you the knowledge and confidence necessary to start editing your travel photographs using this process so that you can take your travel photography to the next level!
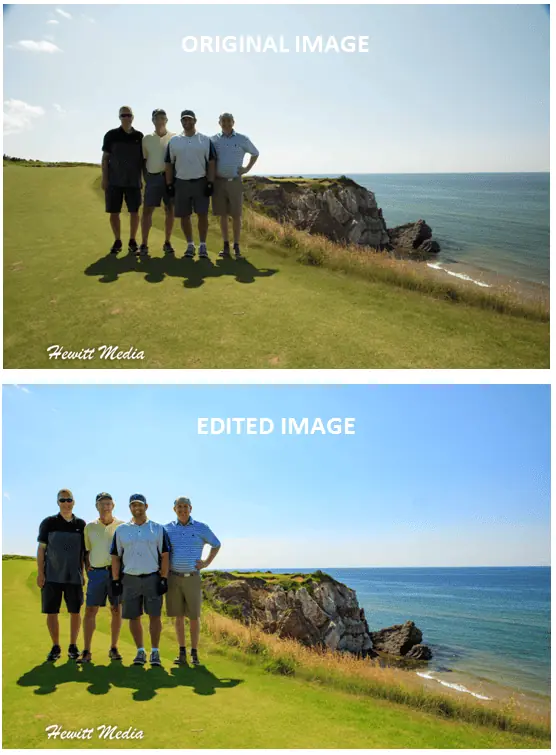
Photo Editing Video Tutorial
If you would like a more detailed demonstration of this photo editing process, I have created a short video that I posted below. In this video, I demonstrate the photo editing workflow that I outlined above using the same picture as an example. Please feel free to watch the video and leave any questions you might have in the comments section below.
Dehaze Editing Video Tutorial
If you are interested in seeing the Dehaze feature in action, I have also created a short video demonstrating this feature of Adobe Lightroom, which I posted below. In this video, I demonstrate how the Dehaze feature can help you highlight certain lost details in your photograph when taking pictures in heavy fog and other challenging conditions.
Don’t Forget to Subscribe to My Adventures!

Let Me Help You Save On Your Next Adventure!
‘Start Exploring Today’ Merchandise Available Now!


Great tutorial! Thanks.
Than you so much Tim! Glad you enjoyed it!
You are welcome. Thanks again.
I use the same steps as well, but I could manage them all on Snapseed app, which is super user friendly. I also prefer lower contrast, but that’s my preference. =)
Thanks for reading Jeremy and fantastic feedback! I will have to check out the Snapseed App!
Awesome blog 🙂
Thank you so much!! 😀
This is awesome! I’m terrible at managing my photos after taking them and I love how you describe what specific changes you want to make to the photo and what to use to make it happen. Thanks!
Thank you so much for the kind words!! So glad you found the tips useful. It makes a big difference with photos! 😀👍