LAST UPDATED: 2/18/26 – Planning Your Travel Photos

If you have been following our blog, you know that I am a big proponent of doing the proper planning before you travel so that you get the best shots when you are there. It is a huge piece of my travel photography workflow. Sure, you’ll probably get some great shots if you just wing it, but you are likely to miss as many great shots as you get.
In this article, I am going to go through the process I use to prep for a photography trip. Because the best way to teach is by example, I am going to use the real prep that I am doing for our upcoming trip to see Machu Picchu this fall. You’ll get to see firsthand how I research which shots I want to get and where, when, and how to get them.
Step 1: Research the Locations
The first step in the process of planning your travel photos should seem pretty obvious. You have to research the locations where you will be traveling. If you don’t know anything about the area, there is no way you are going to be able to start planning which shots you want to get.
Now, when I say, “research the locations”, I don’t mean the type of research that you would typically do to plan a trip. I am not saying you shouldn’t do the regular planning that is involved in travel, as we have written heavily about its importance. This type of research you will need to do in addition to the regular research you do for travel.

Use Pinterest, Instagram, and Google For Initial Research
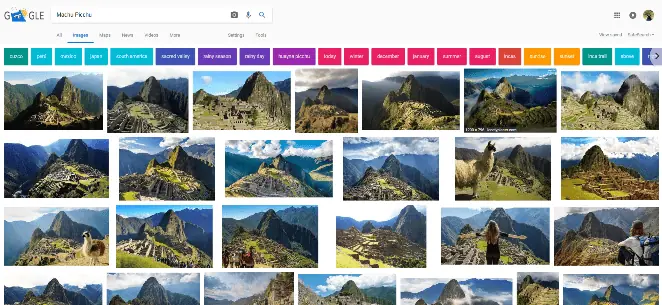
When I am researching locations before I travel, I usually start with Pinterest, Instagram, and Google Images. What I am looking for are interesting and exciting photographs of the locations I am traveling to. For example, here are some of the results I found for Machu Picchu.

What you are looking for when planning your travel photos are images that other people have taken that you find interesting. In this example, there is one image that I am repeatedly seeing that piques my interest (I circled that shot in red in the images above). It is a perspective of Machu Picchu that I find incredibly beautiful. It appears to be a shot taken from a high vantage point that allows you to capture much of the ruins. To get a closer look at these shots, you can click to enlarge the images below.


I will typically save these images to a temporary folder so that I can repeatedly refer back to them in the subsequent phases of my planning process. This way, I will be able to compare them with what I can find in the next phases of the planning process.
Step 2: Map Out the Shots
Once you have a clear understanding of the locations you are traveling to and have an idea of what shots you want to take when you are there, the next step in the process of planning your travel photos is to figure out where you need to be to take those shots.
For instance, in my initial research, I determined that I would like to photograph Machu Picchu from the following perspective (see the image below).

Determine Where Pictures Were Taken
Now, this isn’t the only perspective of Machu Picchu that I have noted in my research, but it is the one that I am using for this example. To take this picture when I get there, I am going to need to know where this picture was taken.
This is especially important when it comes to Machu Picchu because of the following rule changes that went into effect on July 1, 2017:
- All visitors are required to have a guide with them when touring Machu Picchu
- All visitors are required to pick a circuit in which to tour. There are three separate circuits you can choose from, and they don’t all go to the same places within Machu Picchu.
- All visitors are limited to either a day (6am-12pm) or an afternoon (12pm-5:30pm) session within Machu Picchu, which limits the amount of time you have to view the site.
Impact on My Machu Picchu Visit
These rule changes are going to affect our ability to photograph Machu Picchu in several ways. First, we are going to be much more limited in time within the site than people have been in the past.
Based on my research, we will have roughly 3 hours at the site on the tour. The rest of the time will be consumed by lines. I will be talking more in-depth about that in our subsequent articles on our planning process for the trip.
More importantly, the rule changes require us to pick a circuit within Machu Picchu to tour. If I don’t know which locations within Machu Picchu I want to photograph, there is a chance I could pick a circuit that doesn’t visit these locations. This is a prime example of why doing the proper research on shot locations is so critical to travel photography.
| READ MORE: |
 |
| 6 Mobile Photography Tips You Should Know |
Lean on Other Photographers’ Past Experiences
One resource that I would recommend using when planning your travel photos to determine where to get the shots you are looking for is the past experience of other photographers. I will typically do a Google Search for photography location tips for the locations in which I will be traveling. For instance, a quick Google search of the phrase, “Best Spots to Photograph Machu Picchu”, turned up the following results:
- Machu Picchu Photography Locations – Where to Take the Best Shot
- A Photographer’s Guide to the Iconic Machu Picchu – Light Stalking
- How to Photograph Machu Picchu | Meet Plan Go
- Tips For The Best Machu Picchu Pictures
And these weren’t even all of the resources I found. So other photographers’ past experience can be an invaluable resource to get you started in planning your travel photos. You may even learn about other perspectives or shots that you didn’t discover during your initial investigation.
Use Google Earth
Another tool that I find very helpful in planning your travel photos is Google Earth. It is such an amazing tool that can be leveraged for a variety of different travel planning needs. In this case, I use it to see where other people have taken their shots in the past at locations where I am traveling.
Google Earth is a Powerful Tool
In the case of our example, all I would need to do is browse Google Earth on my computer or install the Google Earth app on one of my iOS or Google Play-compatible devices. Once I open Google Earth, make sure that user-contributed photos are being displayed as an option, and then search for your location. In our case, I would do a search for “Machu Picchu”.

The Pictures Others Have Taken are Geo-Marked
Google Earth will browse to your location on the map, and as you zoom in, you will start to see little circles at the locations where people have taken photos. These are GPS-tagged photographs that other people have submitted. So not only do you get to see what pictures they took, but you get to see the general area where they took those photographs.
As you can see in the image above, I have found what I believe to be a photograph of the same perspective of Machu Picchu that I identified in my initial research.
To make sure that this is the same perspective of Machu Picchu that I am looking for, I can click on the image to take a closer look. As you can see below, the image does appear to have been taken from roughly the same spot as the image I identified in Step 1.

This gives me a very valuable piece of information. Now I have a general idea of where I will need to be to take this photograph. I will need to be somewhere in the vicinity of the Casa del Guardian. I still don’t know exactly where I will want to be to take this shot, as GPS can sometimes be off by a little. This is especially true in remote places like Machu Picchu. However, I now have a much better idea of where I need to be to take this shot.
Continue to Refine the Location with Google Maps
Now that we have a pretty good understanding of what general area we need to be in to take a picture of the perspective we are looking for, we can use Google Maps to further refine that location.
Leverage the Street View Feature
The great thing about using Google Maps when planning your travel photos is that the street view feature allows you to actually see a street-level perspective from different locations on the map.
Lucky for us, this includes getting a street-level (or maybe path-level is a more appropriate term) view from within Machu Picchu. The first step will be to open Google Maps and browse to Machu Picchu (as shown in the image below). We will want to look for the Casa del Guardian. As you can see, I was able to locate it by zooming in on Machu Picchu.

Once I have a good idea of where I want to begin, I can start to use the Street View feature. In my case, I am going to want to start by looking at the street view near the Casa del Guardian. I simply drop the person figure onto the pathway nearby, and Google Maps will give me the street view of that location (as shown below).

Follow the Pathways
As you can see in the image above, once I select the person icon for the Street View feature, all of the pathways in Machu Picchu light up blue. I can drop the person icon on any of these pathways to get a street-level perspective of that location.
This is an invaluable tool if you are a travel photographer who cannot scope out an area but would still love to put in some time planning your travel photos. As you can see in the image below, the street-level perspective from near the Casa del Guardian is pretty close to the perspective I was looking for.

Move Around to See the View from Different Spots
In case I want to take a look around the area to see if there are any better locations nearby to take some shots, I can use the arrows within the Street View to move along the pathways (as shown in the image below) and take a virtual tour. This allows me to do all of the location planning I need to do without having to physically scope out the area ahead of time.

As I mentioned previously, this is especially important with Machu Picchu because visitors are being asked to pick a circuit to tour when they purchase their ticket to Machu Picchu. If we pick the wrong circuit, we may not be able to visit some of these locations.
So, I will use the information I get from this picture to make our decision on which circuit we will choose. I’ll be covering that more as I continue to outline our trip-planning process in future posts.
Step 3: Determine the Best Time to Take Them
Now that we know which pictures we are looking to take, and where we need to be to take them, the last step in the process of planning your travel photos is collecting as much information as you can about those shots in advance. Specifically, we are looking for the following types of information about these shots:
- Which direction will I need to shoot?
- What time is sunrise and sunset at the location where I will be visiting?
- Is there any shade to take the shot from?
- Are there typically issues with people obscuring the shot?
- What focal length would be best for the shot?
- Which lens(es) will I need to bring?
- While I need a filter and lens hood for the shot?
The answers to these questions are going to give me a lot of information that I can use when I am on location. For starters, it is going to tell me when the best time is to visit the location and take the shot.
All else being equal, I am always going to want to take the shot during the golden hours of the day. For those unfamiliar with the Golden Hours, please refer to our article on 10 Easy Tips to Make Your Vacation Photos Really Pop.
| READ MORE: |
 |
| 10 Easy Vacation Photos Tips |
In addition to telling me the best time to visit, it is also going to let me know (depending on when I visit) if I will be shooting with the sun in my face or at my back when I take the shot.
This is going to be a huge factor in how I prepare for the shot. If I am going to be shooting into the sun, I am going to want to make sure I can find some shade to shoot from. I will also definitely want to have a lens hood and a neutral density or polarizing filter on hand for the shot.
Addressing these questions ahead of time will also allow me to bring the proper lenses with me when I visit. I can decide whether I will need a wide angle lens to capture the width of the picture from where I will be standing, or whether a telephoto lens will be required to zoom in on some far-away features.
I won’t be able to use a tripod per the rules at Machu Picchu, so the light I will have will be a huge factor in determining which lenses to bring as well.
Finally, doing my research on the locations I want to shoot from ahead of time is going to give me a good indication of how crowded or obstructed these locations might be.
If it is going to be very crowded or my view is going to be restricted by people, I am going to either want to try and plan to visit ahead of the crowds or plan for more time at that location. Waiting for people to clear out of your shot can be frustrating, but if you know you are likely going to have to wait ahead of time, at least you will be prepared for it.
Putting it all Together
I hope that this article gives you a good idea of how I typically prepare to take pictures while traveling. I don’t want to give you the impression that every shot you are going to take on your trip needs to be planned, because that is far from the case. Some of the best pictures I have taken have been unplanned and spur-of-the-moment.
However, if you do the proper planning and preparation beforehand, you will have a better understanding of where, when, and how to take the best pictures, and this will undoubtedly improve your end results.
Don’t Forget to Subscribe to My Adventures!

Let Me Help You Save On Your Next Adventure!


These are great tips that many new photographers don’t even think about. I also use Google Images as inspiration, but its difficult to not copy ideas from it.
Great post! Keep it up 🙂
Thank you!!
I’m spending my last few weeks before our exodus boning up on some photography tips. You are helping me so much. Thanks!
No problem LuAnn!! Happy to hear they are helpful 😀
Thanks, valuable advice.
No problem! Thank you for reading!
Thanks for sharing. It gave me so much valuable tips. I’m not a professional photographer at all. This article was very helpful.
No problem!! Glad it was helpful. Thanks for reading! 😀
Thanks for these tips. Very helpful!
You are very welcome! Thank you so much for reading!