LAST UPDATED: 6/14/25 – Winter Photography Tips
This winter photography tips post contains references to products on our Amazon Store site. We may receive compensation when you purchase these products, though we hand-pick and recommend only the products that we are familiar with and enjoy.
Shooting in the snow can be a magical experience, especially if the snow is freshly fallen. I recently took a trip to Bryce Canyon National Park in Utah and was surprised by a sudden snowstorm. I had visited the park many times in the past, but had never seen it from this perspective before. The entire valley was blanketed with snow, with the canyon’s many rock spires (or hoodoos as they are called) peaking up through the snow. It was breathtaking.

While shooting pictures of cold and snowy locations can be both fun and beautiful, it can also be very challenging. The presence of snow can really take your pictures to another level, but it can also reek havoc with your ability to capture images correctly.
In this guide, I am going to give you some pointers on how to make your next photography venture into the land of ice and snow a success. By following these winter photography tips, you should be able to capture some truly amazing photographs that will wow your family and friends.
| READ MORE: |
 |
| 10 Easy Vacation Photos Tips |
1. Keep Yourself Warm

The number one winter photography tip I can give you for shooting pictures in cold and snowy climates really has nothing to do with your camera at all. The most important winter photography tip I can give you is to keep yourself warm. If you aren’t able to stay warm, then you will have a really hard time concentrating on the shots that you want to get and how to shoot those shots properly.
I always tell people who ask me for tips on photography that the most important thing is to have fun. If you aren’t having fun and enjoying the photography, then you aren’t going to put in the time to improve. Well, if you are freezing cold, you probably aren’t going to be having much fun shooting pictures and probably aren’t going to put in the time necessary to get some great shots.
If I am traveling to a location that has even a possibility of cold and snowy weather, I always bring at least a light jacket, a winter hat, and some gloves. If you plan properly, these things are easy to pack and easy to have handy with you when you are out and about. I have included some recommendations below on cold-weather gear I use on trips to keep me warm.
Fleece or Nano Puff Jacket
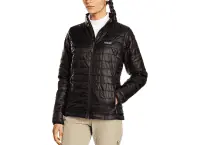
The Patagonia Nano Puff jacket I own is one of the single best investments in travel gear that I have ever made. Not only are these jackets very warm, but they are also very lightweight and compact. When you aren’t using the jacket, it folds up into its own pocket and can easily fit inside your camera bag in case you need it. You will never be left unprepared for changing weather again with this jacket in your bag.
Waterproof Hiking Boots
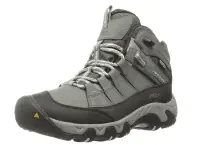
Good hiking boots might not seem like they have all that much to do with photography, but they are an important piece of equipment for any photographer who is going to be working outdoors. This is especially true if you are working in cold, wet conditions.
I am a big fan of KEEN’s hiking shoes and boots as they are very durable and reliable. I have been using their hiking shoes for years and absolutely love them. The most recent pair I purchased are the Oakridge Polar Waterproof boots, and they kept me warm at 8.100 feet in the snow at Bryce Canyon.
Quality Winter Hat

I really like the North Face Reversible Tnf Banner Beanie because it is such a comfortable and versatile hat. It is very lightweight and compact, which makes it a breeze to pack in your day bag or camera bag. It is also a reversible hat, which allows you to wear it with a combination of different jackets. I bring this hat with me every time I travel ,and I have used it quite a bit when I didn’t think I would need to.
Fingerless Winter Gloves

There is nothing worse than trying to take pictures when your hands are numb from the freezing cold, or as annoying as having to take your gloves off each time you want to take a picture. That is why I really enjoy the pair of stretch neoprene fishing gloves that I use when I am traveling to colder climates.
These gloves allow you to quickly remove your index finger and thumb from the gloves while keeping the rest of your fingers and hand comfortably warm inside. With these gloves, you can kiss goodbye the days of suffering with frozen fingers or missing pictures because you were fumbling to take off your gloves.
2. Look for Color to Add to Your Shots

One of the biggest challenges of taking pictures in cold, snowy conditions is preventing your photographs from looking really bland. When you shoot snowy landscapes, the pictures you take have a tendency to end up looking very grey and monotonous.
One of the best winter photography tips for bringing your pictures to life is to try and add some color to the composition. This will break up the boring grayness of your shots and make your pictures look much livelier and more appealing.
For instance, in the picture I took of ice fishing houses on Green Bay in Door County, Wisconsin (pictured above), the picture would be pretty boring and uninteresting if it weren’t for the amazing sunset in the background. In fact, I would go as far as to say that the sunset absolutely makes this shot.
You don’t need to have an amazing sunrise or sunset to make your winter photographs more appealing. Look for color anywhere you can find it. The color might be in the clothing your subject is wearing, beautiful green trees in your background, or a deep blue sky. If necessary, don’t be afraid to introduce some color into the composition on your own. You will be surprised by how much the color will add to your composition.
3. Focus on Shooting Contrasting Objects

Another winter photography tip for breaking up the monotonous grayness that tends to happen when you photograph in winter landscapes is to look for contrasting objects to use in your composition. The contrast between the objects will give different parts of your composition a different look, and the result will be pictures that look much livelier.
A great example is the photograph above, which I took in Bryce Canyon earlier this year. In this photograph, the freshly fallen snow and the red rock hoodoos that are peaking up from the canyon floor beneath that snow sharply contrast with each other. This gives the picture a very unique and beautiful perspective that you wouldn’t see without the snow.
4. Be Careful Where You Walk

One of the best things about taking pictures after a fresh snowfall is how clean and fresh the scenery looks. Some of my favorite pictures I have taken have been after fresh snowfall. Likewise, some of the best pictures that could have been also involved a fresh snowfall, and my lack of attention before taking my shots.
When you are out taking pictures in a snowy landscape, an important winter photography tip is to always be cognizant of where you are walking. This is especially true if you are looking to capture a landscape after a fresh snowfall. You may unintentionally ruin your own shot by walking through an area that you want to shoot.
A great example is the image I included above. This image was shot in Door County, Wisconsin, while I was on a snowshoeing expedition. This shot would have looked a lot better if I hadn’t just ventured out to the lakeside before taking my shot. Sure, the shot is still pretty, but it really does fail to capture the beauty of the fresh snowfall we were just snowshoeing through.
5. Keep the Lens Cap On When Not Shooting

If you are going to be out taking pictures in snowy or wet conditions, then you are going to want to make sure you protect your camera and your lens when you aren’t using them. This includes keeping your lens cap on your camera when you aren’t using it. Not only will this help protect your lens, but it will also help prevent the fogging that can occur with lenses in cold temperatures. This is a critically important winter photography tip because, without a working camera, there is no photography.
6. Cover Your Camera with a Rain Cover

Nothing will ruin your day faster than damaging your camera and not being able to take any more photographs. Believe me, as I have learned this lesson the hard way. While most cameras that are built today are very durable and built to last (especially the top-end DSLRs), no camera is completely immune to the elements.
Investing in one of these rain covers is the winter photography tip that I share with people the most. If you think there will be a chance that you might be out taking pictures in the rain or snow, I strongly recommend that you purchase a rain cover to protect your camera. They are very easy to use and have saved me on more than one occasion.
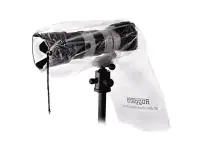
The rain covers I have listed above are both rain covers that I have used and would recommend. The Venterior Waterproof Rain Cover is a more durably built product that is designed to last, while the Ruggard RC-P18″ Rain Cover is more of a disposable product. The Ruggard RC-P18″ comes in a pack of two rain covers for roughly $10, while the Venterior Waterproof Rain Cover sells for about $13.
Personally, I really enjoy the Venterior rain cover because of the side hand entry points. I find the side entry points much easier to use than the rear hand entry point that the Ruggard rain covers have. Both have a draw strap at the front to cinch tightly around your lens and both do an excellent job of protecting your camera from the elements.
7. Keep Your Batteries Warm

Most cameras built today are built to work without issues at temperatures above 32°F. When temperatures drop below freezing, the temperature can have some negative impacts on your camera. Arguably the biggest impact will be on your camera batteries. Batteries do not maintain their charge well under cold temperatures, and as the temperature drops below freezing, your camera batteries will quickly drain their charge. This can lead to having a camera without power if you don’t plan for the weather appropriately.
An easy winter photography tip to ensure that you aren’t left without power is to make sure you have plenty of extra, fully charged batteries with you for backup. This will allow you to swap out batteries as they get drained. The problems with this solution are two-fold. For one, extra batteries aren’t all that cheap. Even if you buy generic backup batteries, they will still cost you a fair amount of money. The other problem is that your backup batteries will also drain faster in the cold temperatures.
An alternative approach is to invest in an Anton Bauer ElipZ 10K Battery Kit. These kits, which are built for a variety of different makes and models of cameras, are designed to be light weight and small enough to fit into your inner jacket pocket. When you need some extra battery charge, the kit can be used to help keep your battery alive. With an Anton Bauer battery kit, you can expect to get about 7.5 hours of battery life out of your camera battery, which is incredible.

8. Keep Your Camera Cold

It may sound counter-intuitive, but when you are shooting pictures in cold conditions, you will want to keep your camera cold. Well, a part from your batteries, that is. If you have ever been in a cold car and seen the windows fog up, you will understand why this is important.
When you take your camera out of a warm spot and into the cold temperatures outside, your lens will have a tendency to fog up. This can be a detriment to being able to take quality photographs. To avoid these issues, I have an easy winter photography tip to share with you. I would suggest that you take your camera out into the cold prior to needing to use it and keep it out in the cold until you are done taking your shots.
9. Shoot in Raw Format

I have talked about this in some of the other travel photography articles that I have written, but it is really important to try and always shoot your pictures in RAW format. This will give you far more flexibility in being able to make adjustments to your pictures in post processing using programs such as Adobe Photoshop or Adobe Lightroom.
When you set your camera to save your pictures in JPEG format, your camera compresses the photographs into JPEGs right on the camera. There are advantages to shooting in JPEG format, as JPEGs take up less space on your memory card. However, you are sacrificing a lot of control over your picture settings in favor of space when you choose to save in JPEG format.
One great example of the picture settings you forfeit much control over when you shoot your pictures in JPEG format is the white balance of your pictures. As you can see in the illustration above, you have far more control over adjusting the white balance of your pictures when you shoot in RAW format versus JPEG format.

I would strongly suggest to anyone looking to get into photography, whether you have experience with photography or not, that you invest in Adobe Creative Cloud. With Creative Cloud, you get a subscription to download and use Adobe Lightroom and Adobe Photoshop. These are essential tools that allow you to do everything from quick and easy edits that are essential, to some of the more advanced edits like exposure blending.
10. Shoot in Manual Mode

When shooting pictures in snowy locations, your camera’s light sensor will often get overwhelmed by the amount of light that is bouncing off the snowy surfaces. For that reason, it may read that it has more light then it actually has. The result is that your images will tend to come out looking darker than they should.
When you use your camera’s auto setting, you really have no way of compensating for this shortcoming by your camera’s light sensor. The camera’s light sensor reads the amount of available light and then automatically sets the aperture, shutter speed, and ISO.
Remember, the aperture, shutter speed, and ISO are all related aspects of photography that control in many ways the outcome of your shots.
Shutter Speed
Controls how fast the shutter on your camera opens and shuts when taking a picture. The quicker the shutter speed, the less likely movement in your pictures will appear blurry.
Aperture
How far open the eye of your lens is when taking a picture. The higher the aperture, the further open the lens gets when taking a picture. The wider the eye of the lens opens, the more light gets exposed to the sensor. The aperture also controls the depth of field in your images. The higher the aperture, the smaller the depth of field.
If you use a very high aperture when taking a photograph, the result will be a bokeh effect (where the part of the image you focused on is in focus, and either the foreground or background is purposely out of focus). This is often used in portrait photography.
ISO
The ISO is the sensitivity of your camera’s sensor to light. The lower the ISO, the less sensitive the sensor is to light and the finer the grain of your image. Higher ISO settings can make up for lower light exposure, but too high of a setting can result in grainy images.
When you use your camera’s automatic mode, you lose control over setting all of these variables as your camera does it automatically for you. The best way to adjust for this is to shoot in Manual Mode. This will give you more control over the key variables that determine how your pictures turn out. When you shoot pictures in Manual Mode, you get to determine what the shutter speed, aperture, and ISO settings are, instead of relying on your camera’s light meter to determine those settings.
Understanding the Relationship Between Aperture, Shutter Speed, and ISO
I have included a diagram below that helps explain the relationships between the aperture, shutter speed, and ISO. Understanding these relationships is essential to being able to properly use your camera’s Manual Mode to take pictures.

If you aren’t quite sure what settings to use when shooting pictures in Manual Mode, a hand-held light meter is a great tool that can assist you in finding the right settings to use. Using a hand-held light meter, you input either an aperture or shutter speed, then select the desired ISO that you want to use. Using this information, the light meter will recommend either a shutter speed (if you specified an aperture) or aperture (if you specified a shutter speed) to use to take your shots.
Keep in mind, the hand-held light meter, just like your camera’s built-in light meter, might over-estimate the amount of available light because of the snow. However, unlike when shooting in your camera’s automatic mode, shooting with your camera’s Manual Mode will allow you to override the settings your hand-held light meter recommends and make adjustments.

The Sekonic L-308X-U Flashmate light meter is a meter that I personally use and absolutely love. It is very intuitive and easy to use, which is important because you don’t want to be fumbling around with your light meter when you are on a trip and taking shots. I have found that the meter is also very accurate, which is fundamental because when you are using a light meter it typically means you are really relying on it. I would absolutely recommend the Sekonic L-308X-U for anyone in the market for an effective and relatively inexpensive light meter.
11. Adjust Your Exposure Compensation

Another great way to compensate for your camera light meter’s inability to correctly read the amount of available light in snowy conditions is to modify the Exposure Compensation setting on your camera. The Exposure Compensation setting allows you to essentially override your camera light meter’s reading for the exposure and adjust the exposure either up or down before an image is taken.
In other words, if you think your camera’s light meter is over-estimating the amount of available light, you can adjust the Exposure Compensation to tell your camera to assume there is less light than its light meter thinks there is. Conversely, if you think your camera’s light meter is under-estimating the amount of available light, you can adjust the Exposure Compensation to tell your camera to assume there is more light than its light meter thinks there is.
Adjusting the Exposure Compensation
The Exposure Compensation (EV) is measured in one step increments and the amount of available increments and their effectiveness in adjusting the exposure will differ by camera make and model. For example, an Exposure Compensation setting of EV+1 steps up the exposure (or lightens the image) by one step, whereas an Exposure Compensation setting of EV-1 does the opposite.
In the example above, I took two pictures of a glacier in Zermatt, Switzerland. As you can in the picture on the left, my camera’s light meter was having a difficult time diserning how much available light there was because of the snowy conditions. The result was a picture that didn’t look very good because it is too dark. For the picture on the right, I increased the Exposure Compensation to EV+2 and it significantly lightened the image.
12. Adjust Your White Balance

As I mentioned previously, another common side effect of shooting pictures in snowy conditions is an almost uniform grayness that envelopes your pictures. This can give your image a very boring and monotonous look that isn’t very appealing.
As you can see in the images above, the White Balance you use when taking your pictures can have a very big impact on whether or not your pictures look lively or sullen. This is especially true if you are shooting pictures of snowy winter landscapes, like I was in Door County, Wisconsin.
The image on the left was taken with the White Balance setting on my camera set to Sunny, which resulted in a very grey and boring looking image. I was able to adjust the White Balance setting in Adobe Lightroom after the fact and it made a huge difference, as you can see in the picture on the right.
If You Don’t Have Adobe Lightroom
If you don’t have Adobe Lightroom, I would recommend changing the White Balance setting on your camera to Cloudy when shooting pictures in snowy conditions. This will automatically warm your pictures up a bit when the picture is taken. Be careful about adjusting the White Balance setting too high though. If you choose the Shade setting, you might end up with yellowish looking snow and clouds, like you can see in the image below.

13. Never Use a Flash

Ok, so maybe the word “never” is too strong, but I would be very careful about using a flash when taking pictures in snowy conditions. There may be occasions where it is absolutely necessary to use one to light your subject, but you should be aware of the unexpected effects that can occur if you use a flash when shooting snowy landscapes.
When you use a flash to shoot snowy landscapes, there is a high likelihood that the light from your flash will bounce off the snowy or icy surfaces in you composition and manifest itself in lens flare if you aren’t careful.
14. Use a Lens Hood

Not only is it important to be wary of light reflections from your flash when shooting in snowy conditions, but it is also important to be wary of light reflections off the snow and ice from other light sources. The most challenging of these light sources is the sun. The sun can really create some challenging photography conditions when there is snow or ice on the ground.
As you can see in the image above, not only is there an issue with lens flares from the bright sunlight, but there is also an almost complete loss of detail in the snow by the person walking. These blown out bright areas (technically known as highlights) can ruin a picture if you aren’t careful.
One way to protect your images from the harsh reflections off the snow and ice is to use a lens hood. A lens hood is an attachment that fits onto the end of your camera lens and protects your images from lens flares and reduces highlights. These hoods are designed specifically for each lens, so be careful to research which lens hoods are compatible with your lenses before purchasing.
15. Use Your Histogram
Not only is it difficult for your camera’s light sensor to properly determine the amount of light available in snowy conditions, it can often be difficult for our own eyes. Especially if you are looking at a small LCD screen on your camera to try and determine if the last image you took was properly exposed.
For this reason, it is important to use your camera’s histogram to determine if you are getting the correct exposures. If you are unfamiliar with how your camera’s histogram works, B&H Photography has a great tutorial. Essentially, what you are looking to avoid is spikes in the histogram on the far left or far right that would indicate a loss of shadow detail in underexposed images or blown out highlights in overexposed images.
Example of Using a Histogram to Check Exposure
In the example below, it may not be immediately apparent that the picture is overexposed until you compare it to the properly exposed example. There is very little detail in sky because it is blown out with highlights. If you look at the histogram for this image below, you can see these highlights that are represented by a spike in the histogram on the far right-hand side.

In an overexposed example of this image, you can see that I do not have the problematic highlights in the sky. However, I do have almost a complete lack of shadow detail in the trees and in the rocks on the shore. This loss of shadow detail takes a lot away from this image’s appeal. If you look at the histogram for this image below, you can see that the loss of shadow detail is represented by a spike on the far left-hand side of the histogram.

If you compare the properly exposed image below with the overexposed and underexposed examples above, the differences are quite striking. There is plenty of detail in the sky and shadow detail in the trees and rocks in the properly exposed example below. This is represented by a lack of spikes on the far left or far right side of the histogram for this image.

16. Increase the Intensity of Blacks in Post Processing

The final winter photography tip I have for you is one of my favorite winter photography tips. When you are shooting snowy landscapes, your camera’s sensor has the tendency to understate the necessary number of blacks in the image. This is truer the lighter the landscape you are shooting becomes.
Using Adobe Lightroom, you are able to adjust the amount of blacks and whites in your image. By doing this, you can greatly improve the amount of detail in the snowy areas of your photos. This is an especially valuable tool when shooting snow-capped mountain peaks, like in the example above that I shot in Grindelwald, Switzerland.
In the image below, I have adjusted the strength of the blacks in the image to enhance the details in the snowy mountainside. You will want to be careful with how much you adjust this setting, though, as adjusting it too high can lead to a loss of shadow details in some areas of your image. You can see that I am walking a fine line between enough detail in the mountains and a loss of detail in the houses and trees below.

Don’t Forget to Subscribe to My Adventures!

Let Me Help You Save On Your Next Adventure!
‘Start Exploring Today’ Merchandise Available Now!
 |
 |
 |
 |
 |
 |
 |


Leave a Reply