LAST UPDATED: 3/3/26 – Galápagos photography guide
This Galápagos photography guide contains references to products on our Amazon Store site. We may receive compensation when you purchase these products, though we hand-pick and recommend only the products that we are familiar with and enjoy.
The Galápagos Islands are an amazing place that draws photographers from around the world each year. Most come to capture its amazing landscapes and wildlife. However, as beautiful as they are, they can also be fairly challenging to photograph. The weather, rocking boats, and the remoteness of the islands are just some of the many challenges photographers face.

In this Galápagos photography guide, I give you some handy tips and tricks for shooting in the Galápagos. I will also give you a list of gear I recommend bringing with you. Using this Galápagos photography guide, you will have everything you need to take amazing photos in the Galápagos Islands.
Have the Right Gear With You

Because of the remoteness of the islands and the exposure you will have to the elements, having the correct gear with you is of the utmost importance. The following list of equipment is what I would recommend that you carry in your bag when visiting the Galápagos Islands.
DSLR or Point and Shoot Camera
There is nothing wrong with using your phone to take pictures, but when you visit the Galápagos Islands, your phone isn’t going to be the best tool to take pictures. To get some good shots of the wildlife, you will likely need more focal range than a cell phone camera can typically provide. You will also likely need to take pictures of moving objects, which cell phone cameras do not excel at.
For these reasons, I strongly recommend that you bring a DSLR camera or a point-and-shoot camera if you don’t have a DSLR with you to the Galápagos. These cameras are much more capable of providing you with the focal reach and exposure speed necessary for shooting wildlife in the Galápagos.
GoPro or Underwater Camera

Because you will be spending quite a bit of time on the water and in the water when you are in the Galápagos Islands, you will want to have a GoPro or underwater camera with you when you visit. You will likely have a countless number of opportunities to photograph and video the wildlife underwater, and you will want to be able to take advantage of those opportunities.
For instance, I was able to get some video and still photographs of Galápagos Sea Lions swimming underwater. These playful animals are such amazing swimmers, and being able to capture photographs like the one above was one of the most amazing experiences I have had as a photographer and videographer.
Red Filter Set
If you do decide to bring a GoPro or underwater camera with you, you will want to make sure you invest in a red filter for your GoPro or camera. Any pictures you take underwater will likely have a green hue as a result of the light shining through the water. A red filter can help correct this green hue and make your images appear more natural.
Red Lens Filter Recommendations
 |
|
| View Recommendations on Amazon.com | |
Wide Angle Zoom Lens with Lens Hood
The Galápagos Islands have some pretty fantastic landscapes that you are going to want to capture. To set yourself up to capture these landscapes effectively, you will want to have a wide-angle zoom lens with you. A wide-angle lens will allow you to capture more of these expansive landscapes in your photographs.
This is especially true if you are using a camera with a crop sensor. Cameras with a crop sensor give you more focal reach, but they also make it more difficult to capture wide landscapes. If you are using a camera with a crop sensor, having a lens that can zoom out to between 10 mm and 18 mm will be very helpful.
Fast Zoom Lens with Lens Hood
There is a lot of amazing wildlife in the Galápagos Islands that you will want to photograph, and to take those photographs correctly, you will need to have a fast zoom lens. As important as it is to have a lens with a long focal length to capture wildlife that is far away from you, it is equally important for that long lens to be fast.
Because you will likely be shooting moving images, often on moving boats, you will need to use a fast shutter speed to capture your images. Using fast shutter speeds will require more light, and that extra light may not always be available. In this case, your options are to either increase the aperture (so the lens lets in more light) or increase your ISO.
In case you aren’t familiar with the principles of shutter speed, aperture, and ISO, I have included a diagram below that explains how they are related. The more you increase the aperture, the wider your camera’s sensor will open to let in more light. Therefore, with a larger aperture, you will be able to shoot with a faster shutter speed and use a lower ISO.

Battery Grip
Another piece of camera equipment that I strongly recommend having in your bag when you visit the Galápagos is a battery grip. Not only will a battery grip allow you to use multiple camera batteries, thus expanding your battery life while out and about, but the battery grips also give you easier access to the shutter button when shooting portrait shots.

Extra Camera Batteries
When you are touring the Galápagos, much of your time will be spent out and about on boats and touring remote locations on the islands to view wildlife. For this reason, it can be difficult to charge your camera batteries frequently. This is why I strongly recommend bringing several backup batteries with you when you visit. With backup batteries in your bag, you won’t have to worry about charging your camera batteries as often.
Plenty of Card Memory
When you visit the Galápagos Islands, you are going to want to take a lot of pictures. There are so many different landscapes and wildlife photography opportunities, and you won’t want to miss any of them. For this reason, you are going to want to have plenty of memory card space to store those images.
Pro Tip: I would also strongly suggest investing in a memory card backup device and a waterproof memory card holder. You are likely to be spending a lot of time in and around the water, and there is a good chance that your equipment could get wet.
Memory Cards Recommendations
 |
|
| View Recommendations on Amazon.com | |
GPS Unit
It can be extremely frustrating to take a great picture while on a trip, only to get back home and not remember where you took the picture. I can’t tell you how many hours I have spent trying to remember where certain shots I took were taken. You can avoid this frustration by investing in a GPS unit for your camera. Many of the upper-end DSLR cameras have GPS capability built in. However, you can also purchase GPS units that attach to most DSLR cameras.
Camera GPS Recommendations
 |
|
| View Recommendations on Amazon.com | |
Camera Rain Sleeve
Because you will be spending so much time on and near the water while in the Galápagos Islands, I would strongly recommend bringing a rain sleeve for your camera. These sleeves protect your camera from rain and splashing water and will give you some peace of mind when you are shooting out in the elements. A rain sleeve will also come in handy when touring the volcanoes in the highlands on some of the islands, as these areas tend to get more rain than other parts of the islands.
Camera Rain Sleeve Recommendations
 |
|
| View Recommendations on Amazon.com | |
Photo Journal
The last piece of equipment I suggest that you bring isn’t actually a piece of equipment for your camera. Instead, a photo journal is a tool that you can use to help you remember what you did on your trip and put your pictures into context. I carry a photo journal with me when I travel, and I spend a little time each night documenting where we visited, what we did, and what new things I saw or learned. It is a great way to keep track of your travels.
General Photography Tips for the Galápagos

Now that you have an idea of what type of camera equipment you will want to have with you when you visit the Galápagos Islands, I would like to discuss some of the general photography tips that will help you capture great photographs when you visit the islands. I have outlined several tips I have found helpful for you to review in my Galápagos photography guide below.
| READ MORE: |
 |
| 10 Easy Vacation Photos Tips |
Use Shutter Priority with Fast Shutter Speed

When you visit the Galápagos, one of the biggest challenges you will face when taking photographs is the constant motion. Not only the motion of your subjects, as many of the animals you will be photographing will be in motion, but also the motion of the platform where you will be standing.
Because you will spend a great deal of time on boats while touring the islands, you will be faced with rolling waves and an unsteady platform on which to take pictures. For instance, when I took the picture above, I had to deal with the rocking boat I was standing in as well as the crashing waves on the rock.
To freeze the water of the waves crashing into the rocks, as well as mitigate the issue with the rocking boat I was standing in, I used a fast shutter speed to freeze the motion. By setting the shutter speed to 1/2000 second, I was able to freeze all of this motion and get some pretty cool shots of the waves crashing against the rocks.
You will also want to use a fast shutter speed when photographing moving animals in the Galápagos. To give you an idea of what type of shutter speed to use for which animals in which circumstances, I have included some examples for you to review in my Galápagos photography guide below. For instance, you will want to use a much faster shutter speed when photographing swimming or flying animals than you will when photographing stationary or walking animals.

Follow the Rule of Thirds

One of the easiest ways to enhance your travel photos is to use the Rule of Thirds. The Rule of Thirds is a long-standing photography principle that suggests images are more visually appealing when the key elements in the image are not centered in the image. Instead, when the subjects are placed in the left, right, top, or bottom third of the image, they are more visually appealing to the viewer. In the example above, I have the Blue-footed Booby I photographed in the Galápagos in the left third of the image.
If you aren’t quite convinced that this will make your pictures look better, please be the judge for yourself. I have included a few examples of the same Blue-footed Booby picture for you to review in my Galápagos photography guide below. Do you think the one where the Booby is centered in the image or the one where the Booby is offset to the left looks better to you?

Take Advantage of Leading Lines

Another way that you can make your pictures look more visually appealing is to use the concept of Leading Lines. Leading lines are natural lines that you find in the subjects you are shooting that naturally lead the viewer’s eyes from one part of the photograph to another. These lines can be pathways, cracks in the ice, or, in the case of the image above, the dock that leads from the shore out to the boat launch in the harbor.
As I have demonstrated in the illustration in my Galápagos photography guide below, the dock in this picture acts as a leading line that naturally guides the viewer’s eyes from the shoreline out to where the boats are being launched. Using leading lines is a great way to help tell a story with your image without having to include any words. I am not saying you necessarily need to go out of your way to include leading lines in your images, but it can be an effective tool to use to give meaning to an otherwise ambiguous image.

Use the Bokeh Effect to Highlight Animals

One of the challenges to taking pictures of wildlife at any location, and the Galápagos Islands are no different, is making the animals stand out in the vast landscapes in which they live. When you take pictures of seals, penguins, tortoises, or birds that live in the Galápagos, those animals can get lost in the vast coastline or highland hills that form the backdrop of your pictures.
A great way that you can highlight the wildlife you photograph is to use a very large aperture, which will give your shot a very shallow depth of field, which in turn will give your pictures an effect that is called the Bokeh effect. With the Bokeh effect, the part of your image that you focus on will be in focus, but the foreground and background of your image will be out of focus. This helps to highlight the wildlife you photograph because only those wildlife subjects will be in focus.
As you can see in the example image of the Galápagos Sea Lion I photographed above, and as I outlined in the illustration in my Galápagos photography guide below, the sea lion is in focus, but the foreground and background are out of focus. This really highlights the sea lion and makes it stand apart from the beach where I photographed it. The Bokeh effect is often used in portrait photography with humans and works equally as well with wildlife photography.

Don’t Miss the Golden and Blue Hours

One of the most effective ways to enhance your travel photos and make them really stand out is to take advantage of the Golden and Blue Hours of the day. In photography, no other factor is nearly as important as the light. During the Golden and Blue Hours of the day, the lighting is soft and perfect for photography.
If you aren’t familiar with the Golden and Blue Hours, I have included a diagram below that helps explain when these hours of the day occur. Essentially, the Golden Hours are the hours just after sunrise and just before sunset. Conversely, the Blue Hours are the hours in the day just before sunrise and just after sunset.
These periods of the day are so important that most travel photographers will work their travels around these hours of the day. They will do what it takes to make sure they are on-site and ready to photograph their subjects when sunrise and sunset roll around. If you want to take your photographs to the next level, I would strongly suggest you try to make the most of these hours of the day to take your photographs.

Use a Red Filter for Underwater Photography

The last photography tip I am going to give you is the tip that is probably the most relevant to the Galápagos Islands. Because you are going to be spending so much time in the water when you are in the Galápagos, you are going to want to make sure you are prepared to take pictures while underwater. One of the best ways to prepare to do that is to have the right filters for photographing underwater.
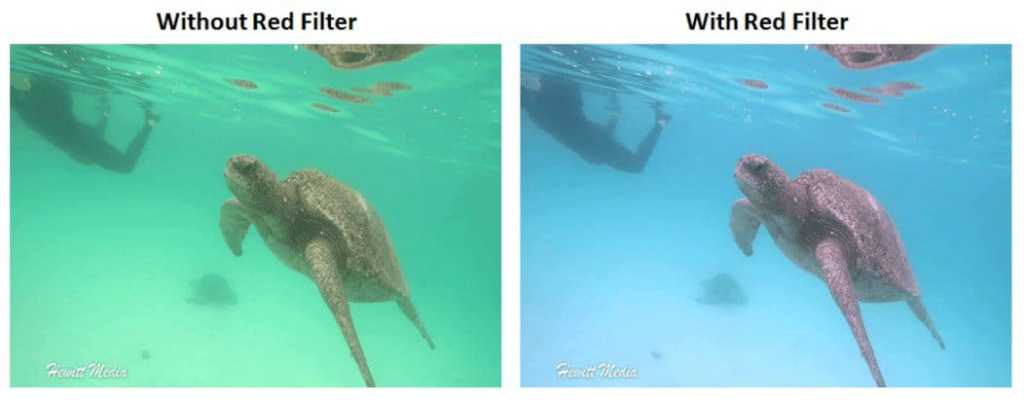
When you take pictures underwater, the pictures you take will tend to have a green hue to them because of the way the light reflects in the water. This greenish hue won’t ruin your pictures, but it does make the pictures look less natural than what you saw with your own eyes when you were diving or snorkeling. One way that you can correct this green hue is to use a red filter on your lenses. This red filter will neutralize the green hue and make your pictures turn out looking much more realistic.
I have included some example images for you to review below so that you can see this for yourself. The picture on the left was taken without a red filter, and the picture on the right was taken with a red filter. You can clearly see the green hue I was referring to in the image on the left. It doesn’t ruin the image, but the image is much less clear than the image on the right. This is a perfect illustration of just how much the correct filter can enhance your underwater photography.
Don’t Forget to Subscribe to My Adventures!

Let Me Help You Save On Your Next Adventure!
‘Start Exploring Today’ Merchandise Available Now!
 |
 |
 |
 |
 |
 |
 |


Thank you. An enjoyable read and well explained tips with clear examples.
Thanks for reading and for the kind words Patrick!