LAST UPDATED: 3/6/26 – Guide to Hiking the Inca Trail
Hiking the Inca Trail is one of the world’s most iconic trekking experiences—a journey that blends physical challenge, ancient history, and breathtaking Andean scenery into a single unforgettable adventure. Whether you’re drawn by the promise of reaching Machu Picchu at sunrise or the allure of walking in the footsteps of the Inca, this guide will help you prepare with confidence and clarity.
The trail’s beauty is matched only by its demands, and understanding what to expect can make all the difference in your experience. From altitude and terrain to weather patterns and daily mileage, hiking the Inca Trail requires thoughtful preparation. This introduction sets the stage for everything you’ll need to know before stepping onto the path that winds through cloud forests, stone staircases, and centuries‑old archaeological sites.

This Inca Trail hiking guide walks you through every essential detail: the fitness level required, how to obtain permits, how to choose the right guide, what to pack, and how to acclimate safely to the altitude. You’ll also learn how to recognize, avoid, and treat altitude sickness, discover the best time of year to hike, and explore the classic route, shorter alternatives, and other trekking options that lead to Machu Picchu.
Inca Trail Hiking Guide Navigation Menu
Before You Go

Before you start planning your hike, you need to make sure you have all the information to plan your adventure. You will want to understand the Inca Trail’s difficulty so that you can choose the right hike. You will also need to know the best time to hike the Inca Trail. Finally, you will need to know what permits you’ll need and what to pack. I have answers to these questions and more laid out for you below in one easy-to-reference location.
Fitness Level Required

Hiking the Inca Trail isn’t as strenuous or as dangerous as alpine climbing can be. However, that doesn’t mean it isn’t challenging or doesn’t have dangers. Before you decide to hike the Inca Trail to Machu Picchu, you need to get in good physical condition. The hike to Machu Picchu on the Inca Trail is a 26-mile hike at a high altitude. So, it is more challenging than your traditional hike through the woods.
Before you commit to this hike, you should review the trial itineraries I have included below. This will help you decide which hike is best for you. If you can’t do the full 26-mile hike, that’s alright. The shorter 2-day hike might be more your speed and is just as incredible. Keep in mind that you will not only have to walk the distance of the trail at altitude. However, you will need to carry your pack with you when you do it.
I would also make sure you properly acclimate to the altitude before your hike. To help you do this, I have included some critical acclimation information for you to review. Of all the dangers on the trail, not properly acclimating is the most common. It can also be the most dangerous, so please take this seriously. Not only should you properly acclimate before your hike, but you should also understand the symptoms of altitude sickness.
Obtaining Tickets and Permits
Because Machu Picchu and the Inca Trail have become so popular, Peru has taken recent actions to restrict access. These steps have been taken to preserve these incredible sites for future generations. These efforts should be commended by everyone. The greatest risk to these sacred sites is degradation by over-visitation. If you understand the limits and plan accordingly, you should have no issues getting the necessary permits and tickets to hike the Inca Trail and visit Machu Picchu.
Machu Picchu Limits
In recent years, Peru has updated its visitor‑management system at Machu Picchu to better protect the site and improve the flow of travelers through the ruins. Instead of the older two‑session system, entry is now regulated through strictly timed entry slots, with multiple start times offered between 6:00 AM and 2:00 PM, depending on the season and the circuit you choose. Daily capacity has also increased from the previous 4,044‑visitor limit; current regulations allow approximately 4,500 visitors per day in low season and up to 5,600 per day in high season.
All visitors are still required to enter Machu Picchu with a licensed guide, and the site continues to operate under a circuit‑based system. When you purchase your ticket, you must select one of the designated circuits, each offering a different route through the archaeological complex. These circuits are designed to reduce congestion, protect sensitive areas, and ensure a smoother experience for everyone exploring the ruins.
Because entry times are fixed and re‑entry is no longer permitted, it’s important to plan your visit carefully and arrive at the gate during your assigned window. In my Machu Picchu Visitor’s Guide, I break down each circuit in detail, explain how the timed entry system works, and share practical tips to help you choose the best route for your visit.
| READ MORE: | |
 |
|
| The Ultimate Machu Picchu Visitor Guide |
Huayna Picchu Limits
If you plan on climbing Huayna Picchu during your visit to Machu Picchu, you’ll need to secure your ticket well in advance. Access to this iconic peak is far more restricted than general entry to the citadel, and tickets often sell out months ahead of time. Because of its narrow pathways and steep drop‑offs, the Peruvian government strictly limits the number of daily visitors to preserve safety and protect the trail.
As of the most recent regulations, only 200 people per day are permitted to climb Huayna Picchu. These tickets are divided into four entry groups of 50 visitors each, with staggered start times throughout the morning. This system helps reduce congestion on the trail and ensures a safer, more enjoyable experience for everyone making the ascent.
Entry times typically begin between 7:00 AM and 10:00 AM, depending on the group you select when purchasing your ticket. Each group is given a defined entry window, and hikers are expected to complete the climb and descent within the allotted time frame for their circuit. Because availability is so limited, it’s essential to book your Huayna Picchu ticket as early as possible—especially if you’re visiting during peak season.
Choosing the Right Guide for You
Hiking the Inca Trail without a guide has been prohibited since 2001, and that rule remains firmly in place today. Every trekker must join a licensed tour operator, and all permits are issued directly to these companies—not to individual hikers. Because the Peruvian government limits access to the trail to 500 total permits per day, demand is high, and spots fill quickly, especially during peak season.
Of those 500 daily permits, approximately 300 are allocated to guides, porters, and support staff, leaving only about 200 permits per day for visitors. This strict cap is designed to protect the trail’s fragile ecosystem and preserve the route for future generations. As a result, reputable trekking companies often book out months in advance, making early research and reservation essential if you want your preferred dates.
There’s no single “right” way to experience the Inca Trail, and choosing the best guide or tour company depends on your travel style, comfort level, and priorities. Some hikers prefer small‑group, budget‑friendly treks, while others opt for more premium experiences with lighter packs, upgraded meals, or additional support. In the sections ahead, you’ll find key factors to consider—from group size and porter policies to itinerary style and ethical standards—to help you choose the guide that’s the best fit for your Inca Trail adventure.
Whether to Use Porters
Most tour groups will supply guides, porters, and other support staff, such as cooks for you. However, not all tour companies supply porters to carry some of your supplies. Depending on how much you are planning on bringing and what you are capable of carrying, this will be an important factor when picking the right tour company and guide for you.
Whether to Use Pack Animals
In addition to porters, some tour companies even supply mules or llamas to assist in carrying some of your gear. With pack animals, the tour company can carry more of your gear than they would be able to with just porters. This is because there are thankfully laws that restrict the weight that porters can carry. If you know that you have a heavy load or aren’t capable of carrying very much for a long stretch, then finding a tour company that uses pack animals might be an important factor for you to consider.
The Trail Itself
Another important factor to consider is which trail or trails the company guides hikes on. In addition to the Classic Inca Trail route, there are numerous alternative routes that you can take.
I have outlined an itinerary for the classic hike as well as a number of the more popular alternative hikes for you to review below. Make sure you study the various hikes well to determine which is most appealing to you. Then, you can look for a tour company that offers to guide you on that route.
The Timeframe for the Hike
The final factor you need to consider when choosing a tour company is the timeframe(s) that they offer. When I say timeframe, I mean how many days they schedule for completing the hike. Most tour companies will offer several different alternatives. This way, they can offer different alternatives to hikes with different skill levels and interests.
For instance, a tour company may offer a 6-day, 5-night Inca Trail hike option. At the same time, they may also offer a 4-day, 3-night option for the Classic Inca Trail hike. They may even offer an abbreviated 2-day, 1-night hike that covers just the last segment of the Inca Trail before Machu Picchu.
When choosing the right tour company, you need to look at their available tours and determine which is right for you. Pay attention to how far they plan to hike each day. Also, make sure you look at how much altitude is gained on each day’s hike. And finally, make sure the dates of their tours work for you.
What to Pack for the Inca Trail

Packing the right gear is important when you hike the Inca Trail. You don’t want to be without a key piece of gear that you will need. At the same time, you also don’t want to carry too much gear and overburden yourself.
To prep you for hiking the Inca Trail to Machu Picchu, I have included a comprehensive packing guide below. Be sure to read this guide thoroughly. In the guide, I provide you with a lot of essential packing information you will want to know.

How to Acclimate to the Altitude

In case you weren’t aware already, the Inca Trail is at a high altitude. In fact, parts of the trail reach as high as 13,807 feet (or 4,227 meters). Because of the altitude, there are additional challenges to completing the Inca Trail hike. These are challenges that you won’t encounter on other long trails at lower altitudes. For an idea of the altitude changes on the trail, refer to the diagram I supplied below.

View Larger Trail Elevation Chart
Recognizing the Symptoms of Altitude Sickness
One of the most dangerous aspects of being at a high altitude is how your body adjusts and reacts to the lower oxygen levels that come with being at a higher altitude. If you aren’t careful and do not acclimate yourself properly, you can suffer from Acute Altitude Sickness, or soroche as it is known locally.
Altitude sickness can be uncomfortable at best and fatal in the worst-case scenarios. In some cases, severe blood clots can form. In addition, if you suffer from other ailments, altitude sickness can compound your other medical issues. You should be able to recognize the early signs of altitude sickness in case you or someone else in your party starts to display symptoms. Those symptoms often include some combination of the following:
The Symptoms of Altitude Sickness
- Fatigue
- Loss of appetite
- Sleepiness or difficulty sleeping
- Nausea or vomiting
- Rapid breathing or shortness of breath
- A headache (the most common symptom)
- Reduced urine production
- Difficulty breathing (the most serious symptom)
How to Avoid Altitude Sickness
It may sound obvious, but the best way to deal with altitude sickness is to avoid getting it. The following tips should help you to minimize your risk of getting altitude sickness on your trip:
Steps You Can Take to Avoid Altitude Sickness
- Acclimate as soon as you arrive to allow your body to adjust.
- Drink Lots of Water.
- Avoid Drinking Alcohol.
- Avoid Smoking.
- Eat Lots of Carbohydrates (your body consumes more energy at high altitudes).
- Look for hotels that pump oxygen into hotel rooms.
- Obtain a portable oxygen tank when you arrive.
- Get a prescription for Acetazolamide.
All of these tips for avoiding altitude sickness are important. However, the most effective way to prevent altitude sickness is to allow your body to properly acclimate. When you arrive in Cusco, you are arriving at an altitude of 11,152 feet (or 3,399 meters). Instead of spending your first day in Cusco, you could travel to the Sacred Valley and spend your first night or two there.
Acclimate in the Sacred Valley
Ollantaytambo and Pisac in the Sacred Valley sit at a lower altitude of just over 9,000 feet (or 2,743 meters). So, spending your first day or two there will allow you to acclimate to that altitude. In turn, this will be easier on your body. Then, when you travel back to Cusco, your body will have a much easier time adapting to that altitude.
Another great thing you can do to alleviate some of the discomforts of adjusting to the higher altitude is to get a prescription for Acetazolamide before you go.
Acetazolamide is used to treat the pressure buildup in your eyes caused by glaucoma. However, it will also help treat the pressure buildup in your sinuses and head because of the altitude as well.
This can help prevent the notorious headaches people get when they adjust to higher altitudes. If you aren’t able to get Acetazolamide, bringing ibuprofen with you is the next best thing.
How to Treat Altitude Sickness
Altitude sickness is one of the most common challenges travelers face when visiting Cusco or beginning the Inca Trail, and understanding how to recognize and prevent it can make a dramatic difference in your experience. The high elevation can affect anyone—regardless of age, fitness level, or hiking experience—so it’s important to know the symptoms and take steps to acclimate properly before starting your trek.
For a deeper look at what causes altitude sickness, how to prepare, and what to do if symptoms appear, be sure to read the Cusco Altitude Sickness Guide 2025, which offers clear, practical advice tailored specifically to travelers heading into the Andes.
Best Time to Hike the Inca Trail

Before you start planning your hike on the Inca Trail, you need to understand what the conditions will be like when you visit. For more information on the typical weather, trail conditions, and tourist numbers throughout the year, I have included a summary for you to review below.
Typical Weather Throughout the Year
For an idea of what temperatures you will experience on the trail, please consult the diagram of average temperatures I have included below.

Dry Season (June – October)
Advantages
- Daytime temperatures will be relatively warm, but cooler than during the wet season.
- The trails will be dry and easy to navigate.
Disadvantages
- Nights will be colder.
- Trails will be crowded as this is the time of year when the trails are busiest.
- During the Inti Raymi holiday (an Incan holiday) on June 24, the trails will be busiest.
- Guided tours tend to be more expensive this time of year.
Wet Season (November – April)
Advantages
- The trails will be less crowded.
- Temperatures are warmer during the day.
- Nighttime temperatures are warmer.
- There is a lot more rain (typically heavy afternoon storms).
- Guided Tours tend to be cheaper.
Disadvantages
- Trails may be washed out or susceptible to mudslides.
- Visibility is much poorer.
- The trails can be more dangerous because of wet conditions.
Best Time to Visit (May – June, October – November)
Because the trails tend to be crowded during the dry season, and in less-than-stellar conditions during the wet season, the best times to make the hike to Machu Picchu on the Inca Trail tend to be during the shoulder seasons between the wet and dry seasons.
During May and June, as well as during October and November, you will find fewer crowds on the trail than during the peak of the dry season. The trail also tends to be in much better condition than it is during the peak of the wet season.
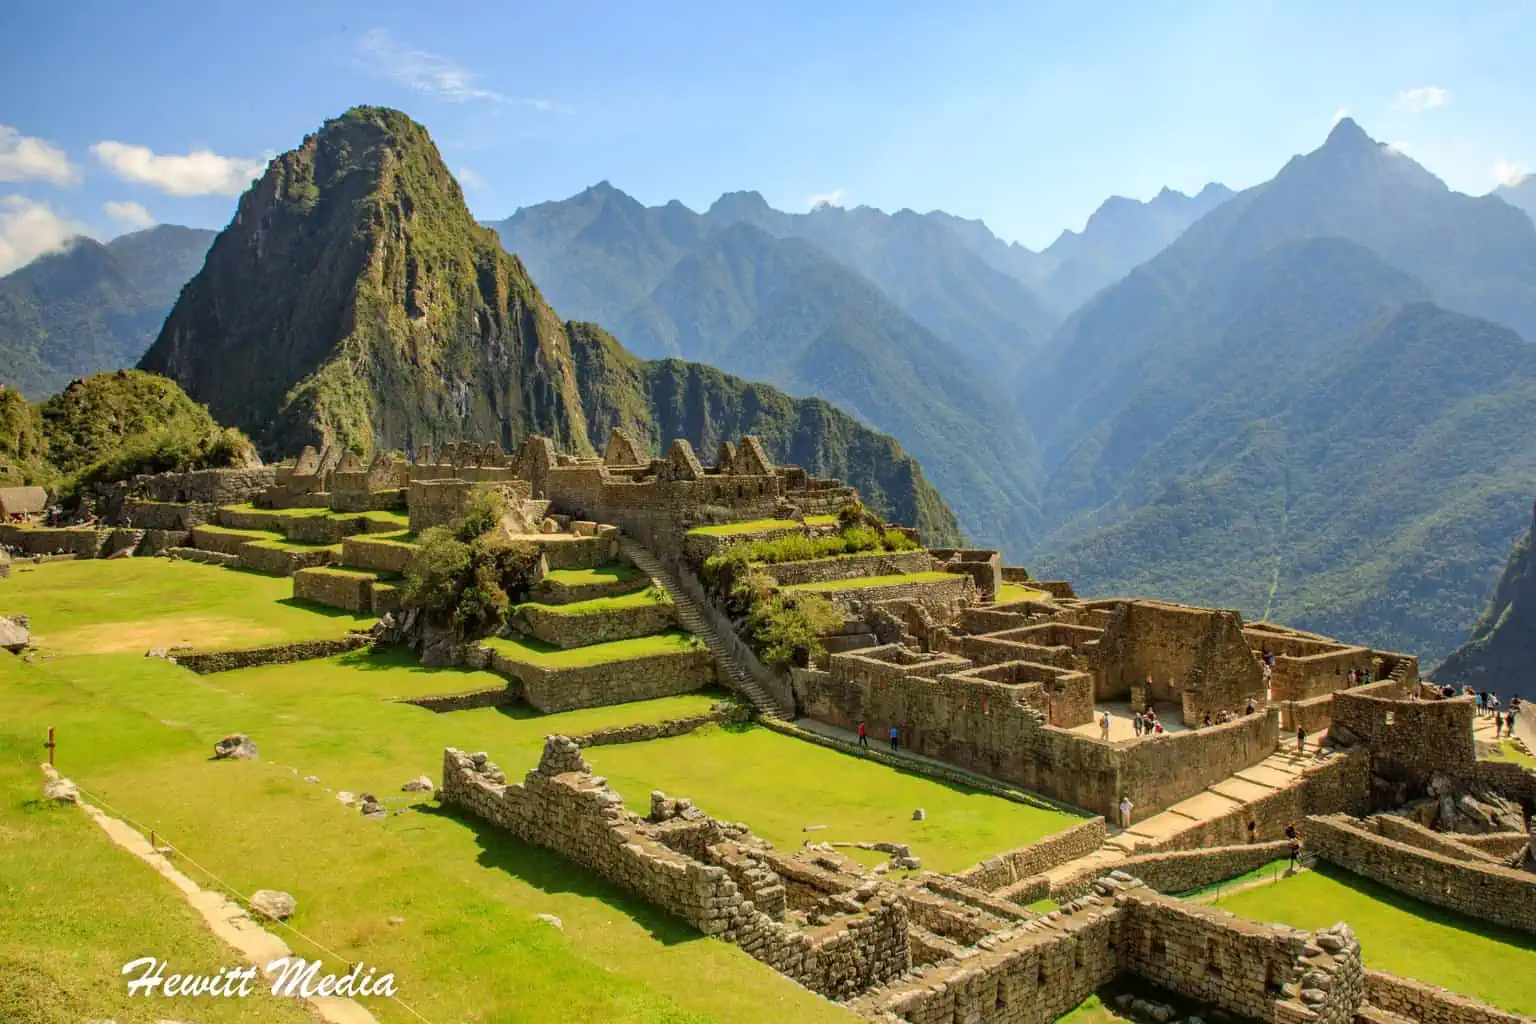
Hiking the Inca Trail to Machu Picchu

Hiking the Inca Trail to Machu Picchu is one of the world’s most infamous hikes. The scenery that you encounter along the trail is absolutely gorgeous. Not only that, but the cultural experience is amazing as well.
You get to see some of the most well-preserved Incan archeological sites in the world. Hiking the trail to Machu Picchu is a great way to walk in the footsteps of the Incas. This way, you can truly appreciate how amazing this journey was and still is.
As you read the itineraries below, please remember you can hike this trail at any pace comfortable for you. In fact, I have included a few different options for itineraries that you can use. However, there are tour companies that extend this trip up to a week as well.
All-in-all, the classic Inca Trail to Machu Picchu is roughly a 26-mile (43km) trek if you do the entire thing. So, breaking that up into manageable day hikes will depend greatly on your ability. It will also depend on the time constraints that you are working with.
The Classic Machu Picchu Inca Trail Hike

If you are looking to add a little bit of adventure to your trip to see Machu Picchu, hiking the Inca Trail to get there is a fantastic way to enhance your trip.
If you are into backpacking, beautiful vistas, and cultural experiences, then the classic Inca Trail hike will be right up your alley. I have included a popular 4-day and 3-night itinerary for you to review below.
But as I said previously, this hike can certainly be done over a longer period if you would like to break it up into more manageable segments based on your hiking skill level.

Day 1
Day one of your trip to Machu Picchu along the Inca Trail will start really early. You will have to make your way from your hotel in Cusco to the trailhead for the Inca Trail. The trailhead is near the Ollantaytambo train station in the Sacred Valley. There are several different ways in which you can get to the Ollantaytambo train station from Cusco, which I have outlined for you below.
It is a 37-mile or 60-kilometer drive on roads that wind through the mountains and small villages, so it will take you 75-90 minutes to make the journey. Please make sure you leave yourself enough time to get to the train station by early morning. If you are hiking the Inca Trail with a tour company, chances are they will be organizing this transportation for you. Please be sure to check with them on the logistics before you arrive in Cusco.
Taxi
If you would like to take a taxi to the Ollantaytambo train station, your hotel concierge or front desk will be able to arrange one for you. If you do decide to hire a taxi from the street, please make sure the taxi is a licensed taxi. The fare will cost you around $30 US for the one-way trip to Ollantaytambo train station.
Shared Taxi
If you would like to save a little money on the transportation costs to Ollantaytambo train station, a good way to do this is to take a shared taxi from the taxi terminal on Pavitos Street.
These shared taxis will cost you around $3.60 US per person and leave the station between dawn and roughly 6:30pm daily.
The taxis only leave once they are filled up, so you may have to wait a while before you leave. Please make sure you allow yourself extra time if you are going to choose this option.
Bus
This is far and away the most time-consuming and complicated way to get to the Ollantaytambo train station from Cusco, so we don’t recommend it. However, if you do decide to take a bus, please read the information below carefully to ensure that you don’t lose time because you are unprepared.
Catch a Bus to Urubamba
To take the bus, you will need to catch a bus to Urubamba from the Grau Street terminal. Buses leave every 15 minutes between dawn and roughly 6:30pm, and the bus ride can take anywhere between 90 and 120 minutes. Fares for the bus are roughly$1.25 US. When you get to Urubamba, cross over to the other side of the terminal and take a shared minibus to the Ollantaytambo train station.
Take a Shared Minibus to Ollantaytambo Train Station
The fare for the minibuses is roughly $0.55 US, and the ride typically takes around 30 minutes. This means, together, you should plan for it to take around three hours to get to the Ollantaytambo train station from Cusco by bus.

Once you get to the Ollantaytambo train station, you will begin your hike. When you get to Kilometer 82, that is the first checkpoint and the official start of the Inca Trail. The hike on the first day is just shy of 7.5 miles (or 12 kilometers), so it is a decently long day of hiking on the first day. Along the way, you will get to check out the Patallacta archeological site, which will be your first taste of Incan architecture on the Inca Trail.
Trail Stats
| Walking Distance: | 7.45 miles / 12 kilometers |
| Starting Elevation: | 9,000 feet / 2,743 meters |
| Campsite Elevation: | 9,840 feet / 2,999 meters |
| Difficulty Level: | Moderate |
Day 2
You will want to have a good night’s rest on your first night on the trail because the second day of hiking will be more challenging than the first. After breaking camp, you will hike for roughly 5 hours on the trail as you ascend to the top of Mount Warmihuañusca.
This is the most challenging part of the hike on day two, but you will be rewarded with some absolutely stunning views of the Andes mountains from the top. Get some good rest as you enjoy the views, because you will still have a fair amount of hiking to do after reaching the top.
You will make a descent from Mount Warmihuañusca until you reach Pacaymayo, where you will spend your second night.
Trail Stats
| Walking Distance: | 8 miles / 13 kilometers |
| Starting Elevation: | 9,840 feet / 2,999 meters |
| Campsite Elevation: | 11,808 feet / 3,599 meters |
| Difficulty Level: | Difficult |
Day 3

On the third day of your hike, you will make a big push towards Machu Picchu. After starting off from Pacaymayo early in the morning, you will make a gradual ascent until you get to Runkauraqay, and then descend roughly 3,700 feet (or roughly 1,130 meters) as you head to Sayacmarca.
Here you will get to see another fascinating Inca archaeological site. You will also want to take a break in Sayacmarca because you will be ascending back up nearly as high in the second part of the day’s hike as you make a final push towards Wiñay Wayna (which translates to “Always Young”).
You will be climbing roughly 3,200 feet (or roughly 975 meters) to make it to your campsite at Wiñay Wayna for that night.
Trail Stats
| Walking Distance: | 9.3 miles / 15 kilometers |
| Starting Elevation: | 11,808 feet / 3,599 meters |
| Campsite Elevation: | 11,930 feet / 3,636 meters |
| Difficulty Level: | Moderate to Difficult |
Day 4

The fourth day of your hike is the big day because you will be making your final push toward Machu Picchu. The hike is mostly decent as you drop from 11,930 feet (or 3,636 meters) at Wiñay Wayna to the 7,875 feet (or 2,400 meters) where Machu Picchu rests.
Enjoy the hike as the views of Machu Picchu and the mountains that surround it are absolutely stunning. If you get an early enough start, you can reach Machu Picchu for some absolutely breathtaking sunrise views over Machu Picchu, which I strongly recommend.
To get back to Cusco after visiting Machu Picchu, you can take the train back to the Ollantaytambo train station, and then take a taxi, shared taxi, or bus ride back to Cusco.
Please make sure you save yourself enough time as the train ride typically takes a few hours to get from Machu Picchu to the Ollantaytambo train station and then you have at least a few hours to get back to Cusco from there.
An Abbreviated Inca Trail Hike to Machu Picchu

If you would like to hike the Inca Trail to Machu Picchu, but think that the classic Inca Trail hike might be a little too much for you, then you might be interested in the popular shorter hike that I outline below. This hike gives you a taste of the Inca Trail without having to make the larger commitment that the classic hike requires.
The hike takes a few days to complete and will require one overnight camping on the trail, but the hike mostly drops in elevation, so it isn’t nearly as challenging as the classic Inca Trail hike. I would recommend this hike for anyone who wants to add a little adventure to their trip to Machu Picchu but isn’t incredibly experienced as a hiker.

Day 1
Day one of your trip to Machu Picchu along the Inca Trail will start really early, as you will have to make your way from your hotel in Cusco to the trailhead for the Inca Trail, which is near the Ollantaytambo train station in the Sacred Valley. There are several different ways in which you can get to the Ollantaytambo train station from Cusco, which I have outlined for you below.
It is a 37-mile or 60-kilometer drive on roads that wind through the mountains and small villages, it will take you 75-90 minutes to make the journey. Please make sure you leave yourself enough time to get to the train station by early morning. If you are hiking the Inca Trail with a tour company, chances are they will be organizing this transportation for you. Please be sure to check with them on the logistics before you arrive in Cusco.
Taxi
If you would like to take a taxi to the Ollantaytambo train station, your hotel concierge or front desk will be able to arrange one for you. If you do decide to hire a taxi from the street, please make sure the taxi is a licensed taxi. The fare will cost you around $30 US for the one-way trip to Ollantaytambo train station.
Shared Taxi
If you would like to save a little money on the transportation costs to Ollantaytambo train station, a good way to do this is to take a shared taxi from the taxi terminal on Pavitos Street. These shared taxis will cost you around $3.60 US per person and leave the station between dawn and roughly 6:30pm daily.
The taxis only leave once they are filled up, so you may have to wait a while before you leave. Please make sure you allow yourself extra time if you are going to choose this option.
Bus
This is far and away the most time-consuming and complicated way to get to the Ollantaytambo train station from Cusco, so we don’t recommend it. However, if you do decide to take a bus, please read the information below carefully to ensure that you don’t lose time because you are unprepared.
Catch a Bus to Urubamba
To take the bus, you will need to catch a bus to Urubamba from the Grau Street terminal. Buses leave every 15 minutes between dawn and roughly 6:30pm, and the bus ride can take anywhere between 90 and 120 minutes. Fares for the bus are roughly$1.25 US. When you get to Urubamba, cross over to the other side of the terminal and take a shared minibus to the Ollantaytambo train station.
Take a Shared Minibus to Ollantaytambo Train Station
The fare for the minibuses is roughly $0.55 US, and the ride typically takes around 30 minutes. This means, together, you should plan for it to take around three hours to get to the Ollantaytambo train station from Cusco by bus.

Once you arrive at the Ollantaytambo train station, you will take the train towards Machu Picchu until you get to kilometer 104. Here, you will disembark the train and begin your hike to Machu Picchu. The first part of the hike is a four-hour uphill climb to Wiñay Wayna, where you will get to enjoy the Incan archeological site and take a break before continuing on the hike.
After moving on from Wiñay Wayna, you will hike towards Inti Punku (which is translated to mean “the Sun Gate”). Here you will be able to look down and catch your first glimpse of Machu Picchu below. Take some time to enjoy the views as they are absolutely breathtaking. This is where the Inca Trail officially ends. You will camp out and prepare for your visit to Machu Picchu the next day.
Day 2
Today is the big day that you visit Machu Picchu. You have the option of either hiking to Machu Picchu on the trail that leads to the site from Inti Punku, or you can take a bus to the site if you don’t feel like hiking any further. I would recommend that you get up nice and early so that you can get to Machu Picchu for the sunrise. You won’t regret it!
To get back to Cusco after visiting Machu Picchu, you can take the train back to the Ollantaytambo train station, and then take a taxi, shared taxi, or bus ride back to Cusco. Please make sure you save yourself enough time as the train ride typically takes a few hours to get from Machu Picchu to the Ollantaytambo train station and then you have at least a few hours to get back to Cusco from there.
Alternate Inca Trail Routes

The Classic Inca Trail is amazing, but depending on your goals, your experience level, and what you would like to see, it may not be the best trail for you. If you have already hiked the Inca Trail or are looking for a different challenge, there are some alternatives to the Inca Trail that you can hike when you visit Machu Picchu. To give you some ideas, I have compiled a list of some of the more popular alternative hikes for you to review below.
The Salcantay Route

If you are looking for a more challenging route to get to Machu Picchu, then the Salcantay Route is a great option that you can consider. This route takes you 15,000 feet (or 4,572 meters) up the 20,500 feet (or 6,248 meters) high Mount Salcantay, which was one of the holiest mountains of the Incas. This is higher than any point you will reach if you take the classic Inca Trail to Machu Picchu.
From there you will descend down into a cloud forest where you meet up with the ancient Inca Highway that traverses the entire Inca kingdom. You will get to see the recently discovered ruins of Llactapata and get to see some amazing views of Machu Picchu as you approach Aguas Calientes, the small town at the base of Machu Picchu.
Time Required – 5 to 8 Days
Difficulty – Moderate to Difficult
The Lares Route

If you are looking for an easier hike that avoids the crowds of Peru’s Sacred Valley, then the Lares route may be a good option for you. This hike takes you through the Lares Valley, which sits on the Northern edge of the Sacred Valley.
The Lares route takes you back in time as most of the small towns you pass through on this route still live the traditional Andean life by raising llamas and alpacas, farming, and making their own traditional Andean clothing.
The hike starts in the town of Lares and provides you with some great views of the 18,000-foot (or 5,486 meters) high Mount Veronica along the way. You will end the hike at the Ollantaytambo train station, where you can catch a train to Machu Picchu or continue on the classic Inca Trail.
Time Required – 3 to 5 Days (from Lares to Ollantaytambo train station)
Difficulty – Moderate
The Chaski Trail
The Chaski Trail is another great alternative to the classic Inca Trail hike that you can consider if you are planning to visit Machu Picchu. This trail follows some of the routes that the Chaski messengers of the Inca Empire used to follow as they delivered goods and messages throughout the empire.
These messengers were so fleet of foot that it is said they could deliver fresh fish from the Pacific Ocean 300 miles away. As you follow in the footsteps of these famed messengers, you will get a first-hand view of an Incan quarry and see how the Incans harvested rocks for their buildings.
You will also get to stop at the gorgeous Perolniyoc waterfall, which sits near some Incan ruins. The trail concludes at the Ollantaytambo train station, where you can either take a train to Machu Picchu or continue on the classic Incan Trail to the site.
Time Required – 3 to 5 Days (to Ollantaytambo train station)
Difficulty – Moderate
Vilcabamba Traverse Route

For experienced hikers who are looking for a more challenging hike than the classic Inca Trail, the Vilcabamba Traverse Route is a great option. This hike should definitely only be considered by experienced hikers who are in great physical condition, as it will challenge you both mentally and physically.
Hikers will traverse high mountains, cloud forests, beautiful grasslands, and low mountain valleys with river crossings on this hike that takes a week to two weeks to complete. You will get to see the remote ruins of Choquequirao (“Cradle of Gold”), which has become increasingly popular in recent years because of its similarity to Machu Picchu.
You will also get to see the sparsely populated Cordillera Vilcabamba, which looks much like it did when the area first started to be explored over a century ago. Finally, the trail ends just a short trek or train ride from Machu Picchu. If you are up for the adventure and capable of completing this hike, it is certainly the adventure of a lifetime.
Time Required – 7 to 14 Days
Difficulty – Difficult
Don’t Forget to Subscribe to My Adventures!

Let Me Help You Save On Your Next Adventure!
‘Start Exploring Today’ Merchandise Available Now!
 |
 |
 |
 |
 |
 |
 |


Great and informative post. I have a milestone birthday in a couple of years and I’m considering Machu Picchu as a celebratory trip. A great starting point for planning.
It is such an amazing trip! You will love it! 😀