LAST UPDATED: 2/26/24 – Enhance Sunset Photos in Eight Easy Steps
We have all been in a situation where we experienced an absolutely amazing sunrise or sunset during our travels, snapped some pictures that we cannot wait to get home and show to our family and friends, only to discover that those pictures are completely underwhelming when you get home and review them.
First off, don’t beat yourself up. Not only isn’t it your fault as a photographer that the photographs didn’t turn out as amazing as you expected, but it is very easy to fix sunset photos that you have taken so that they look like the wonderful works of art that you were so excited to share.
In this guide, I am going to show you how to enhance sunset photos using an easy-to-follow eight-step process. Not only is this process easy for just about anyone to follow, but all of this editing can be done with your smartphone.
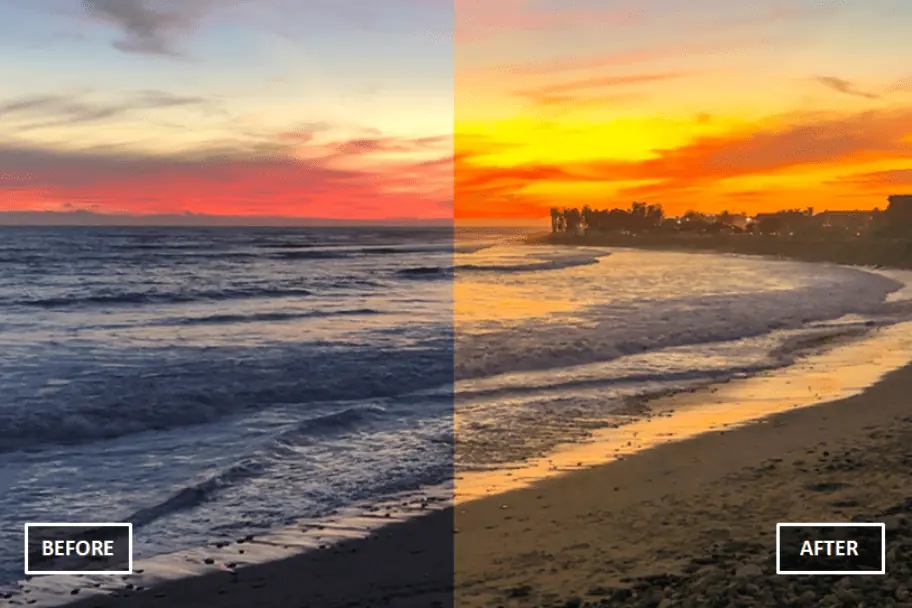
However, before we start getting into the process of how to enhance sunset photos, let me start by explaining why some of these sunrise and sunset photographs you are taking end up looking less beautiful than you remember them being in the first place.
Your Camera’s Sensor Isn’t as Good as Your Eyes
It all starts with your camera. While camera technology has come a long, long way in the decades since digital cameras were introduced, there will never be a camera that can match the image processing capability stored within you. That’s right, we all take our eyes for granted sometimes, but they are capable of processing images at a level that is just tough for technology to match.
So when you see a breathtakingly beautiful sunset on your trip, snap some photographs, and then get home and think to yourself that you remember the sunset being so much more beautiful than in your picture, you are absolutely right.
When you take a photograph, your camera captures light, which it feeds to the camera’s sensor. There are a lot of different variables that can influence how a photograph turns out, which I cover in my Ten Easy Tips to Make Your Vacation Photos Really Pop guide. Even if you follow all of these tips and have your camera configured correctly, your camera’s light sensor is just not as sensitive or as accurate as your own eyes.
As a result, your photographs may end up looking too dark with a sky that is far less colorful than the brilliant display of reds, oranges, purples, and yellows that you remember enjoying on your trip. Yet fear not, because many of these shortcomings can be dealt with after your photograph has been taken. This means that most often you can fix sunset photographs with just a little bit of post-editing.
How to Predict Sunrises and Sunsets
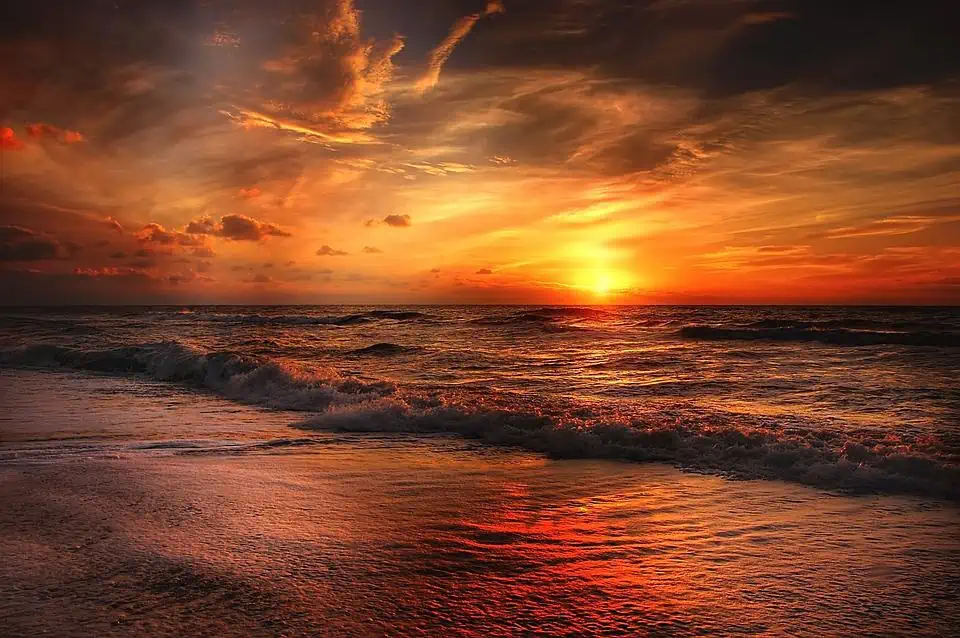
Before you can even worry about how to enhance sunset photos, you need to find a sunrise or sunset to photograph. While many of the amazing sunrises and sunsets that you have seen in your life may seem like nice surprises, there is a fairly straightforward process that you can use to take at least some of the mystery out of these events.
No, you won’t be able to predict great sunrises and sunsets like a photographic Nostradamus, but if you understand the environmental factors that make great sunrises and sunsets more likely to occur, you will be ready to photograph more of them. For more information on how to predict amazing sunrises and sunsets, please refer to my guide below.
| READ MORE: |
 |
| Predicting Amazing Sunrises and Sunsets |
How to Enhance Sunrises and Sunsets
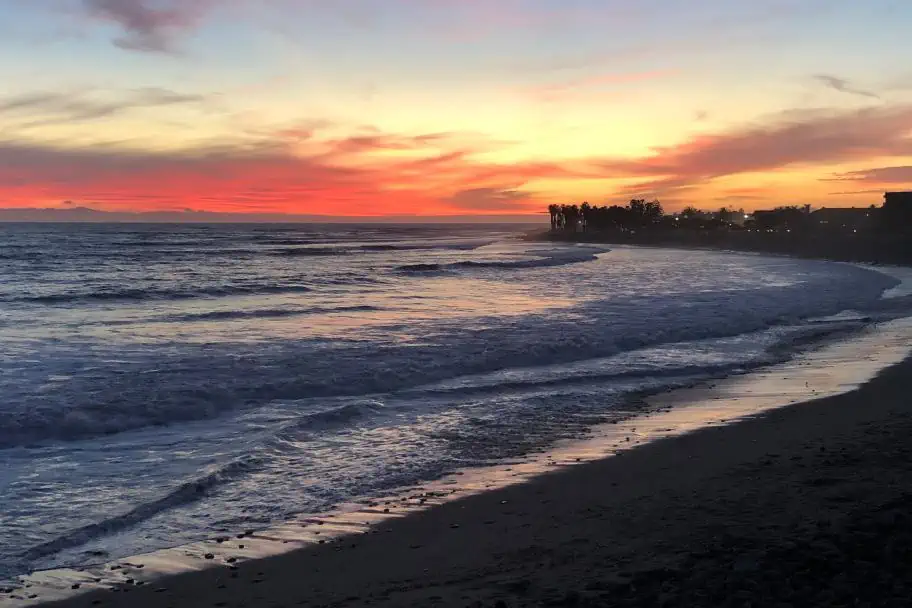
If you follow me on Instagram (and I really appreciate your support if you do), then this photograph I took of a sunset I saw in Ventura, California probably looks vaguely familiar. However, the photograph that you remember from my feed is a lot more detailed, vibrant, and colorful. While this picture is pretty, it isn’t nearly as beautiful as the scene I remember from my trip.
The beach in the foreground and the city in the background are almost totally obscured by shadows, there is very little detail in the waves, and the sky that I remember being on fire with color looks fairly muted in this picture. In this guide on how to enhance sunset photos, I am going to use this photograph to teach my simple eight-step process to you.
Step 1: Get the Adobe Lightroom App

The first step that you need to follow to enhance sunset photos is to make sure you have the right app to edit your photographs. There are a lot of photo editing apps out there, but in my opinion, Adobe Lightroom is the best.
In addition to being one of the most popular photo editing desktop applications on the market, Adobe has also published a Lightroom app for iOS and Google Play that is very affordable. If you use another app for photo editing that has all of the features I reference in this article, I encourage you to follow along with the application you are most comfortable with.
Step 2: Open Your Picture in Adobe Lightroom
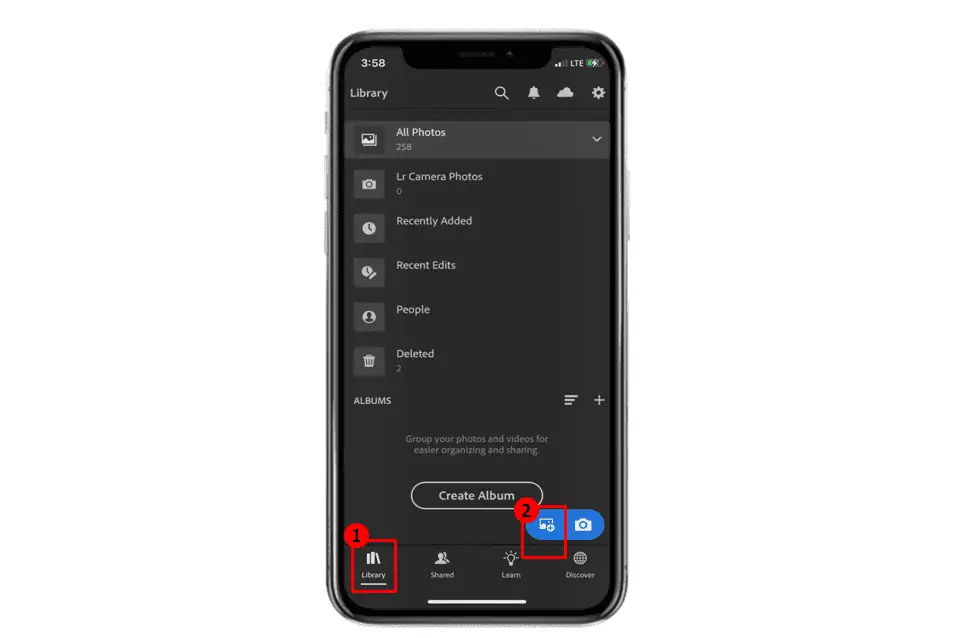
| Select the Library icon to show your picture library. | |
| Use the Select Photo icon to select a photo to add to Lightroom. |
Once you have the Adobe Lightroom app installed on your computer or phone, the first thing you need to do is open the photo you wish to edit. To do so, you will need to choose your Library, and then select the Add Photo icon to browse for a photo to add to Adobe Lightroom (as shown above).
Step 3: Reduce the Highlights and Lift the Shadows
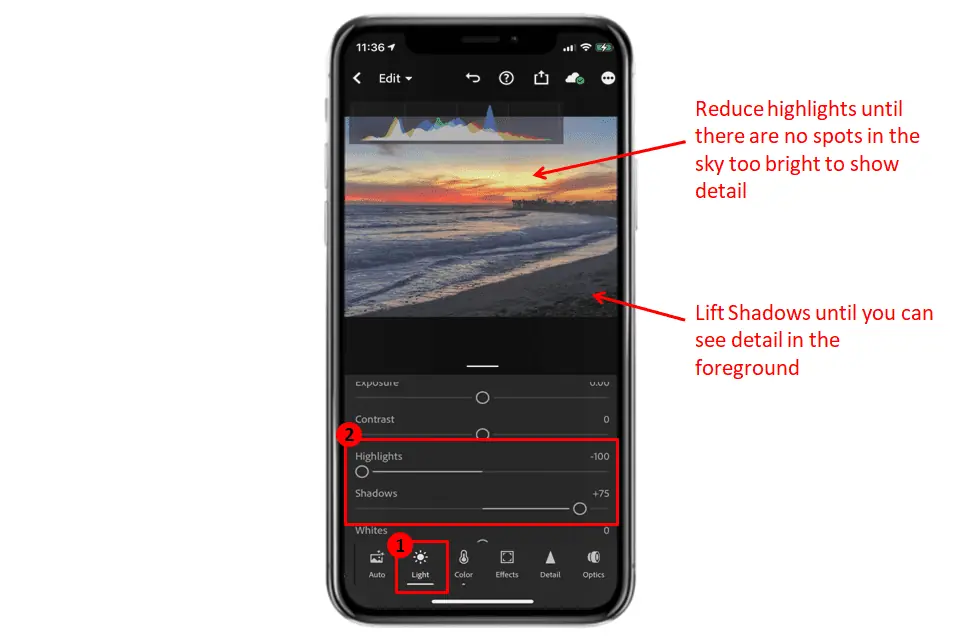
Once you have a photo added to Adobe Lightroom, the first thing you will do to enhance sunset photos is to adjust the amount of highlights and shadows. If you aren’t familiar with what highlights and shadows are in photography terms, a Highlight is any part of your image that the camera’s sensor detected too much light to show detail.
These areas of your photograph will look almost pure white and are typically found in the sky where the sun is brightest and in areas of your photograph where there are reflections. Shadows, on the other hand, are areas of your photograph where the camera’s sensor detected too little light to show detail. These areas of your photograph will be very dark and lacking detail. If you are facing the sun when you take a photograph, typically the face of any object facing away from the sun will have strong shadows present.
In my example photograph, there are quite a few shadows in the foreground near the beach and in the city in the background. This really takes away from the photograph because it is really hard to see those portions of the image. There is also a part of the sky in my photograph near the sun that has a lot of highlights. This isn’t unusual when shooting a sunrise or sunset shot, but we will want to minimize those highlights so that we can see more of the cloud detail in the sky around that spot.
In Low Light, Keeping Your Camera Still Is Important
Pro Tip: If you are shooting photographs in lower light, such as is typical around sunrise or sunset, you are going to want to make sure you keep your camera or phone as still as possible when taking your photos. The lower the amount of light there is, the longer your camera or phone camera’s sensor has to stay open to take the photograph.
The longer your camera’s sensor stays open, the more susceptible it is to something known as Camera Shake. Camera shake is any movement of the camera as a photograph is taken that results in the photograph being blurry. Even the slightest movement can translate into a blurry image. If possible, bring a small tripod with you when you travel. They even make really small, light tripods for phones these days. Also, whenever possible, avoid photographing when there are moving objects in your image that are relatively close to you.
Step 4: Adjust the Temperature and Saturation
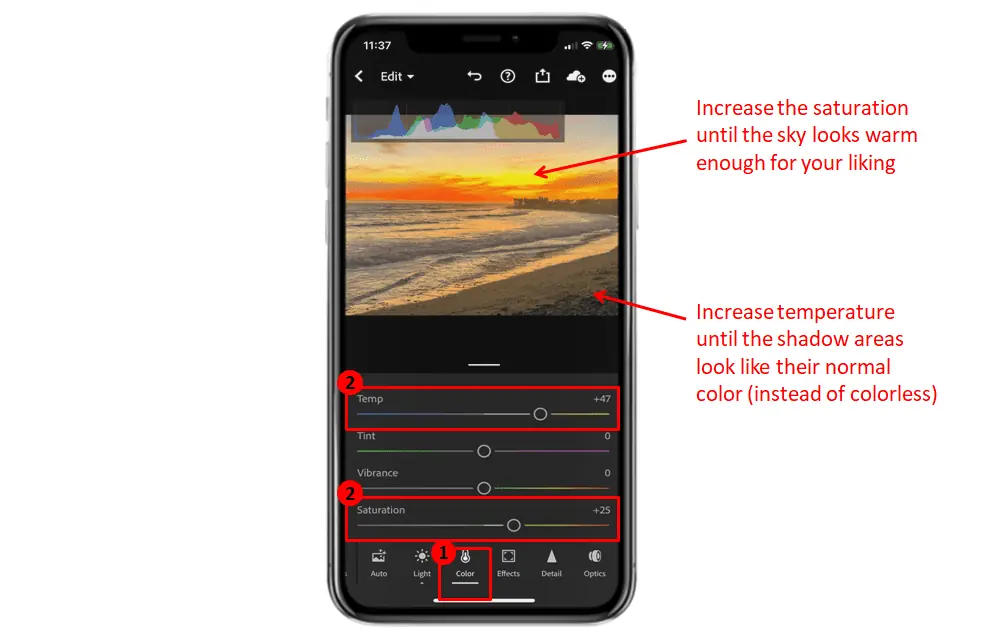
| Select the Color tab at the bottom of the application screen. | |
| Increase the Temperature and Saturation of your image until you like how it looks. |
Now that you have reduced the amount of highlights and shadows in your photograph, you should be able to see a lot more detail in the foreground and the sky of your image. The next step to enhance sunset photos is to liven up the sunset in the sky, which may look a lot less impressive in your photograph than you remember it being. Again, don’t feel bad, this isn’t really your fault. Similar to its inability to take in and analyze as much light as your own eyes, your camera’s sensor is also less efficient in interpreting other visual aspects such as temperature and saturation.
In case you are unfamiliar with these terms, Temperature in a photography sense is the color warmth of the light that your camera’s sensor interprets. Just like the light bulbs you buy for your house, the warmer bulbs will have more of a yellow hue to them, whereas the colder bulbs will be a colder white color. When there is low light, such as on a cloudy day, while you are photographing in the shade, or around sunrise or sunset, your camera’s sensor will typically under-sense the warmth of the light. This can result in cold, seemingly colorless shadows and less than brilliantly colored areas that have more light.
Increasing the Temperature of Your Photo Will Bring the Colors Back to the Dark Areas
Two great ways to compensate for the incorrect temperature of your sunrise or sunset photographs are to increase the Temperature of your photograph or increase the saturation. If you are wondering, the Saturation of an image is the depth or intensity of the colors found in the image. Increasing this value can help compensate for the more muted colors interpreted by your camera’s sensor when there is low light.
When I enhance sunset photos, I will typically increase both the temperature and the saturation of the image when I edit it. How much I increase these values depends on the image and how much I think it needs it. To adjust these values in Adobe Lightroom, select the Color tab at the bottom of the application and then increase the temperature and saturation until you feel comfortable with how your image looks (as shown above).
Step 5: Dehaze the Photograph if Necessary
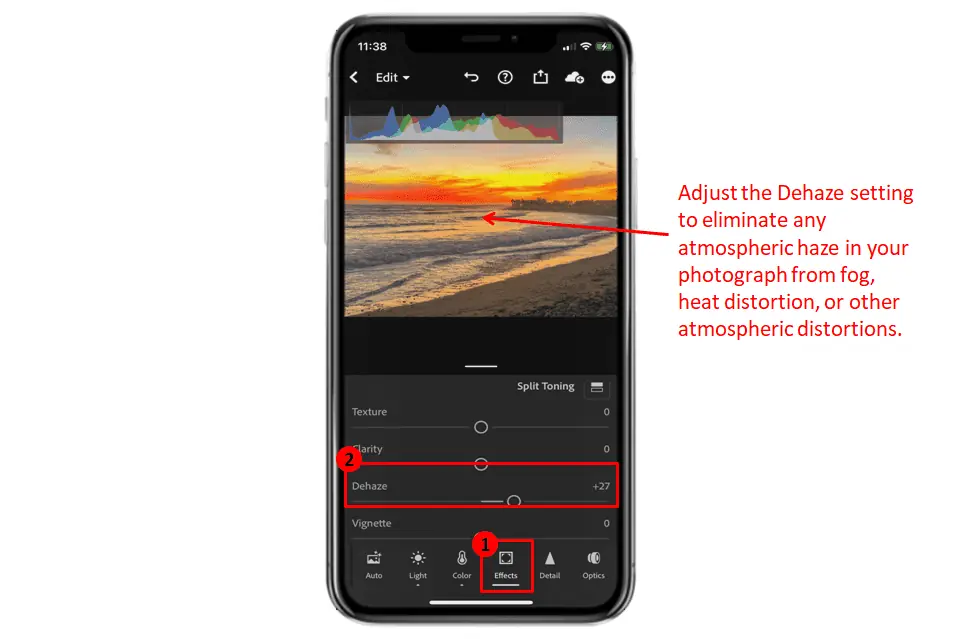
| Select the Effects tab at the bottom of the application screen. | |
| Increase the Dehaze feature until your photograph looks clear enough for your liking. |
Now that you have adjusted the temperature and saturation of your photograph, it really should start to look more like the sunset that you saw with your own eyes. The sky is probably much more vibrant and colorful and the foreground and background colors where you lifted the shadows have a warmer and more life-like color. However, if you really want to fix sunset photos so that they will really WOW your family and friends, your work is not done. The next step is to eliminate some of the atmospheric haze from your photo that may have been caused by heat distortion, fog, or other atmospheric noise.
You will do this by adjusting the Dehaze feature within Adobe Lightroom. Simply navigate to the Effects tab at the bottom of the application window, and then adjust the Dehaze setting until you are satisfied that your image is clear. However, you will want to be careful as adjusting this value too high can do more harm than good. If you accidentally adjust this value too much, you can simply dial the amount of dehazing back until you are happy with your photo.
Step 6: Zoom in and Check for Noise
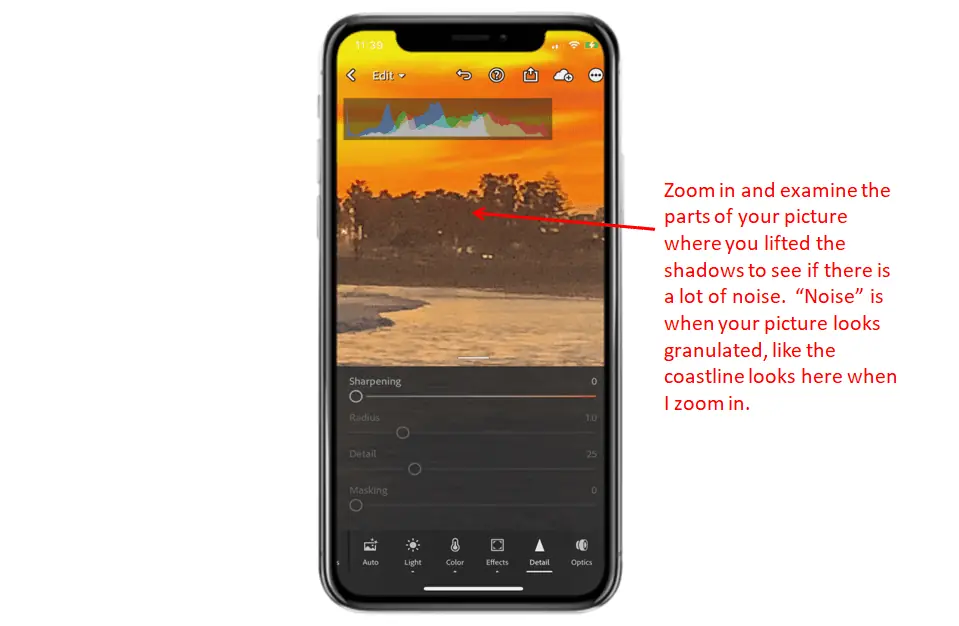
The final step that you will take to enhance sunset photos is to remove any unwanted noise from your image. In photography terms, Noise is any unwanted distortion in your image that is caused by your camera’s sensor being unable to properly interpret the light for those portions of your photograph. Several types of noise can occur, and the result of all of them is not good for your photos.
You will most often see noise in areas of your photograph that had strong shadows that you lifted or highlights that you suppressed (in step one of my process on how to fix sunset photos). When you lift shadows or reduce highlights to show more detail, most often there isn’t enough data for these areas of the image, and so the result is that these areas will look grainy or pixelated.
You don’t want to share a subpar image with your family or friends, so it is important to check for noise and correct it before you finish with your photo. To make it easier to spot the noise, you will want to zoom in on the areas of your image that had the most shadows. Look at these areas closely and determine if they look grainy and pixelated. If they do, there is noise in these areas and you will want to take corrective action.
Step 7: Remove the Noise if Necessary
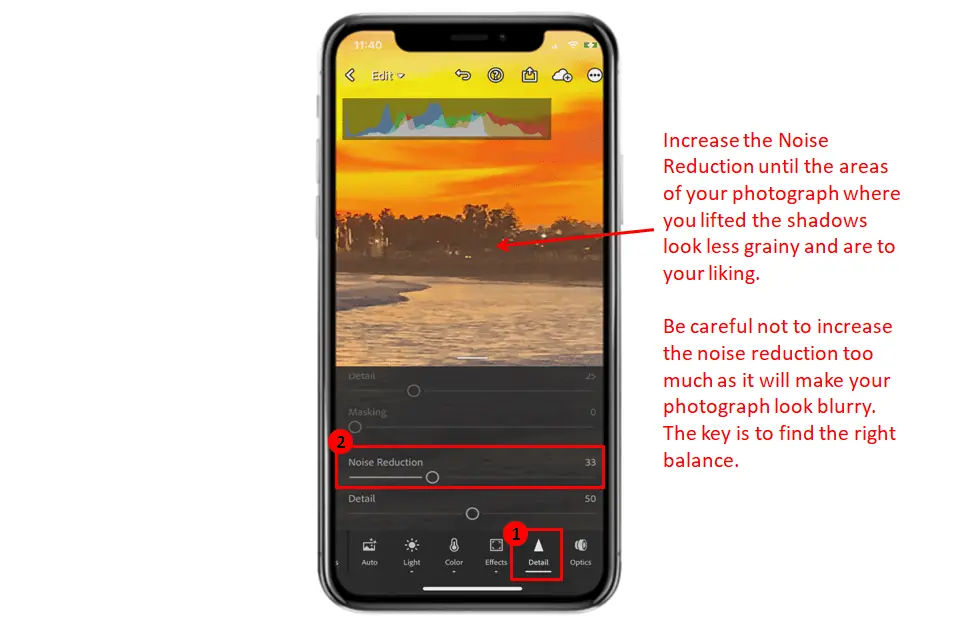
| Select the Noise Reduction tab at the bottom of the application screen. | |
| Increase the Noise Reduction feature until you are satisified the noise in your photograph has been corrected. |
If you spot noise in your image, there is no need to be alarmed. Unless the noise is really bad, oftentimes it can be corrected. To eliminate the noise from your photograph, you will want to navigate to the Detail tab at the bottom of the application screen and then adjust the Noise Reduction setting until the grainy, pixelated spots in your photograph look smoother.
Be aware, that when you adjust the noise reduction setting, you are adjusting the entire image, not just the images with noise. So if you adjust this setting too high, you can end up with a photograph that looks blurry.
As a rule of thumb, I would not adjust the Noise Reduction much higher than 35. If you still have noise after increasing the Noise Reduction this high, it may be better to go back to Step 3 and reduce the amount you lifted the shadows and highlights. This could take some back-and-forth adjustment until you find the right mix.
Step 8: Export and Share Your Photograph
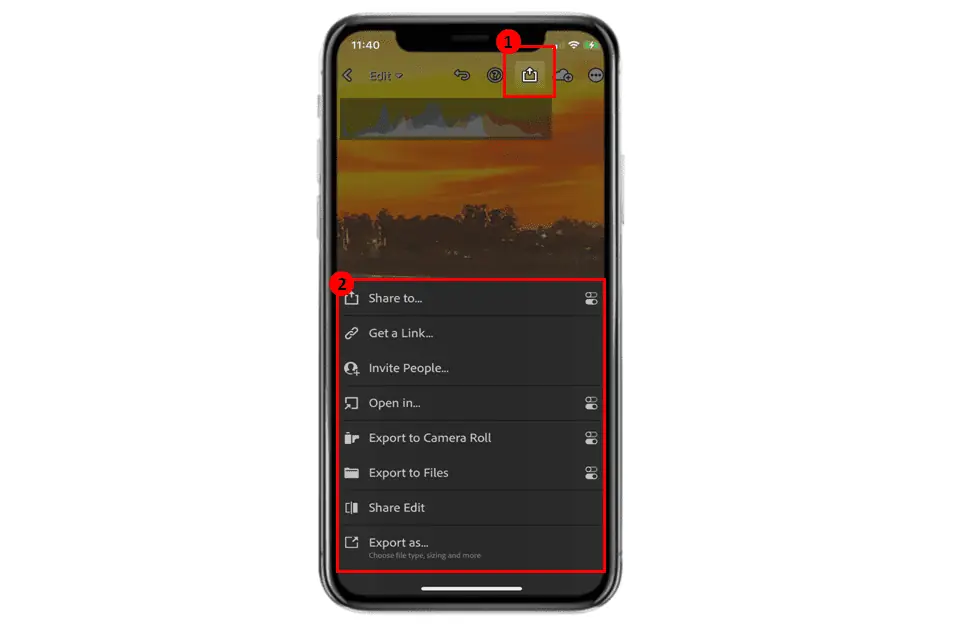
| Select the Export button on the top toolbar of the application window. | |
| Choose the method in which you would like to share your photograh. |
Now that you have enhanced your sunrise or sunset photo, it is time for you to share it with your family and friends. To do that, you will have to first export the edited photo out of Adobe Lightroom to your computer or your phone’s camera roll. While viewing your final photo from within the Adobe Lightroom app, select the Export button on the top toolbar and then select the method you would like to use to share the image (as shown above).
The Finished Photograph
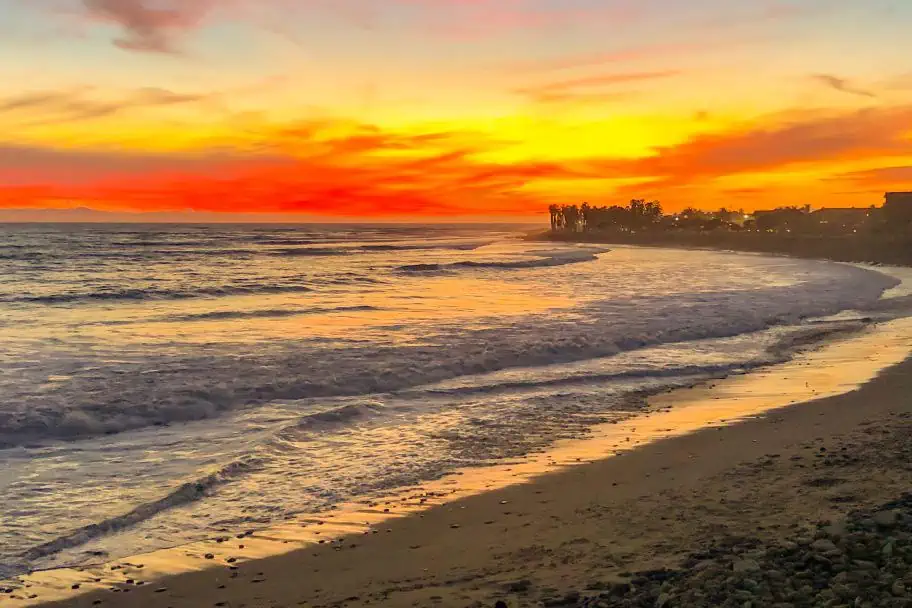
After completing my simple eight-step process to fix sunset photos, the end result of editing my sunset shot that I took in Ventura, California turned out like this. While I won’t claim that it is a masterpiece, it is certainly much more visually appealing than the unedited photograph that I saw when I looked through my camera roll when I got home. All it took to turn this photograph into the Cinderella I knew it would be was some polishing in Adobe Lightroom.
If you think that you need a fancy, expensive DSLR to take great sunrise and sunset photographs, let me tell you a little secret. This shot I took with my iPhone 10, not my DSLR. So even if you don’t have a big buck DSLR, you can capture Instagram-worthy photographs to share with your friends. All it takes is a little effort and some know-how. So get to work!
Other Beginner Photography Guides
If you found this travel photography article on how to fix sunset photos helpful, then you might enjoy some of my other travel photography articles and tutorials. To help you get started, I have linked to some of my favorite ones for you to review below!
| READ MORE: |
 |
| Exposure Blending for Dummies |
| READ MORE: |
 |
| Ten Important Tips for Avoiding Photography Issues When Traveling |
Don’t Forget to Subscribe to My Adventures!

Let Me Help You Save On Your Next Adventure!
‘Start Exploring Today’ Merchandise Available Now!



Leave a Reply