LAST UPDATED: 3/17/26 – Tutorial on Exposure Blending
In this installment of my Art of Travel Photography series, I am going to talk to you about one of the photo editing processes most commonly used by photographers today. This editing process is a bit more advanced, but I am going to illustrate the process for you in very easy-to-understand terms and simple-to-follow steps.
For those of you who aren’t familiar with exposure blending, it is the process of blending two images that were taken at two different exposures to make one balanced image.

To put it in simpler terms, you take one picture at a high exposure (to lighten the darker areas) and one picture at a low exposure (to darken the light areas) and then combine the images to get the best of both worlds in one shot.
Consider This Real-Life Example
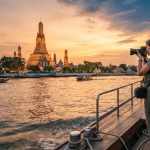
To further illustrate the concept, let’s use a real-life example for my tutorial on exposure blending. For instance, let’s look at the picture I have posted above. In this image, we have a boat dock and boats on a lake with a beautiful sunset in the background. This image is actually an exposure blending of two separate images.
The first image I took was a high-exposure image that lightened the boat dock and boats so they weren’t just silhouettes. The second image was a lower exposure image that really brought out the colors in the sunset in the background.
By combining both of these images using exposure blending, I can get the details on the boat dock and boats and the colorful sunset in the same image.
Why Not Use Luminosity Masks?
Now, some of you who have more experience with photography might be asking, “Why didn’t he just use luminosity masks”? And you are right, using luminosity masks would be an easier and more effective way to do this. However, it is also a more difficult process to learn, so I won’t be covering it in this tutorial on exposure blending.
My goal is to give those who may not have as much photography experience the tools to take their travel photography to the next level. For that reason, I decided to outline the manual blending process because it is easier to learn.
However, for those of you who are interested in learning more about how luminosity masks work and how you can use them, here is a fantastic tutorial on using luminosity masks to do exposure blending. It takes some practice to get the hang of it, but it is a very effective tool to have in your tool bag once you learn.
Step 1: Take the same image at two different exposures

The first step in using exposure blending is to obtain your images. To get two images of the exact same thing, you are going to need to use a tripod. If your pictures vary even a little bit, you won’t be able to use this technique. So, you are going to want to get your camera set up on a tripod and make sure you are set up for the shot you want.
Always Use a Tripod
Once you have your camera and tripod ready, you are ready to take your pictures. You will want to take one picture at an exposure that is high enough to give you the detail in the areas of your photo where you want details. In the example above, I used an exposure of 1/40 second to get the shot on the left. This shot is light enough to show the detail of the sand on the beach, the dock, and boats on the water.
Conversely, your second shot should be at a much lower exposure to show any detail that might get blown out in a higher exposure. For example, in the image on the right above, I used an exposure of 1/125 second to bring out the colors and detail in the sky that were lost in the higher exposure image. The problem with using this image alone is that the details on the beach, dock, and boats are all lost because the exposure is too low.
Exposure Bracketing Features Can Help
To make things easier, most DSLR cameras have a built-in feature called exposure bracketing. The exposure bracketing feature will automatically take a high and low exposure shot when you take a picture.
This is useful because it means you won’t have to fidget with your camera between taking the high and low exposure shots, which could move the camera ever-so-slightly and wreck the process. So, if this functionality is available on your camera, we suggest you take advantage of it.
Step 2: Make adjustments to those images in Adobe Lightroom

Once you have your two images, the next step is to use Adobe Lightroom to make any necessary adjustments to the images. For instance, if you want to adjust the white balance of your image, this would be the ideal time to do so.
I would suggest steering clear of adjusting the shadows and highlights, as you don’t want to introduce noise into your images. Part of the power of exposure blending is that you will be able to use the more exposed image to bring out some of the detail that is hidden in the less exposed image when you blend the images together.
Export the Images Out of Lightroom When Finished
Once you have finished making any necessary adjustments, export the images out of Lightroom so that they can be imported into Photoshop for the next step in the tutorial on exposure blending.
| READ MORE: |
 |
| Simple Five Step Photo Editing Process |
Step 3: Import those images into Adobe Photoshop

Now that you have your photos, we can start to talk about the exposure blending process. To blend them, you are going to need to load them into Adobe Photoshop. To do this, select the File menu, then select Scripts, and finally select Load Files into Stack to load the images into the Photoshop stack.
Step 4: Make sure the high-exposure image is on top

Once the photos are in Photoshop, as I have illustrated above, you are going to want to make sure that your high-exposure image is listed on top. If it isn’t on top, you can use your mouse cursor to drag and drop the high-exposure image on top of the lower-exposure image. This order will be important to complete the next steps in the tutorial on exposure blending.
Step 5: Use the Selection Tool to select the area you want to mask

Now that the images are loaded in Photoshop in the correct order, we can start preparing to make our mask. The mask is what is going to allow part of the lower exposure image (the sky) to become visible while hiding those parts of the higher exposure image.
Put the Higher Exposure Image on the Top
Put in simpler terms, we are going to essentially put the high exposure (or lighter) image on top of the lower exposure (or darker) image and then erase the parts of the higher exposure image that we don’t want to use so that those parts of the lower exposure image will become visible.
The easiest way to erase the area of the high-exposure image that we don’t want to use, thus exposing the area of the low-exposure image that we do want to use, is to use the selection tool. The selection tool allows us to select the entire section of the sky so that we can make that the selection for our mask.
The [ + ] option allows you to add parts to your previous selection, while the [ – ] option allows you to remove parts of the image from your previous selection. Once you have just the sky selected, you are ready to move on to the next step.
Step 6: With the high-exposure image selected, add a mask

In this step, we create the mask that will allow us to do our exposure blending. With the selection of the sky made, we simply hold down the ALT key and then press the add mask icon (as shown above).
Once the mask is added, you will notice that the sky from the high-exposure image will disappear, exposing the sky from the low-exposure image that we want. You will also notice a second image icon next to the high-exposure image that looks something like the image below.

This is the mask that Photoshop has created based on your selection of the sky in the image. The portion of the high-exposure image that was visible in the sky area is now hidden in favor of the sky portion of the low-exposure image.
We Aren’t Quite Finished
You will notice that, while the general image we are looking for is starting to take shape, the image is far from perfect. It is very noticeable that we took two separate images and combined them.
This is especially noticeable with the hills in the background that are too highly exposed (or too light) for how dark the sky is. We will address that in our next step by doing some refinement blending.
Step 7: Use the Eraser Tool to further blend

The last step in the exposure blending process is to use the eraser tool (as shown above) to further refine the blending of the two images. In the case of our example, we are going to start by erasing some of the top (or high exposure) images to reveal some of the bottom (or low exposure) images beneath them. This will make the transition between the two images much less transparent and make our image look more realistic.
Don’t Use 100% Opacity
It is important to note that we aren’t using 100% opacity when we do our erasing. If we did, we would be left with the same solid transition lines between the upper and bottom layers, and we would fail to create the smooth transition that we are looking for. Instead, we recommend using something in the neighborhood of a 30% opacity and then layering your eraser strokes to give it a nice smooth transition.

As you can see in the illustration above, what we are doing in this step is essentially making that hard line between the black (low exposure image) and white (high exposure image) less noticeable by using the eraser tool to erase 30% of the top layer (with a 30% opacity setting).
We can then move closer to the transition line and add another coat, which would give that area a 60% opacity. Then we can move even closer to the middle transition line and add a final coat, which would give the area just above and below the line a 90% opacity. The end result will be a nice, smooth transition as you see in the final product below.
The Final Product
As you can see in our final image, we have taken advantage of the colorful sky that we were able to capture with our low exposure, and combined that with the foreground detail on the beach and boats that we were able to get with our high exposure shot. To make the transition between the two layers less noticeable, we did some further blending around the transition line.
| READ MORE: |
 |
| Enhance Sunset Photos in Eight Easy Steps |
Practice Makes Perfect
Practice makes perfect, so we have included the two images that we used for our demonstration below. Please feel free to save them to your computer and use them to practice doing an exposure blend.


Follow Me on Instagram
If you enjoy my travel photography content and would like an easy way to show your support, please give me a follow on Instagram. It is a lot of work to put together this content and run this site, so your support in the form of a follow would be very much appreciated!
FOLLOW ME!
Don’t Forget to Subscribe to My Adventures!

Let Me Help You Save On Your Next Adventure!
‘Start Exploring Today’ Merchandise Available Now!
 |
 |
 |
 |
 |
 |
 |


Reblogged this on Vietnam Travel & Trade Portal.
Dummies like me 🙂 Thanks!! This is Invaluable! 🙂
Thanks for reading! 😀
Thanks for sharing 😉 I love learning how to use photoshop 😉
Thank you so much for reading!
What is the level below dummy? That is where I am at 😊
I bet you would surprise yourself 😀
LOL Novice 😉
I do use Lightroom but have not yet graduated to Photoshop. It is on my list for when we return from our trip. Thanks!
Right on! 👍👍